

ngrok can verify webhooks from 70+ providers out of the box. See the complete
list of supported webhook
providers.
How it works
Webhooks hit one public address that you configure for your Cloud Endpoint. A single Traffic Policy on that address checks the signature on every request, rejects anything that fails, and only forwards verified requests. The ngrok agent opens an outbound connection to ngrok and forwards webhook traffic to your internal service, so you never have to open an inbound port or tap your firewall.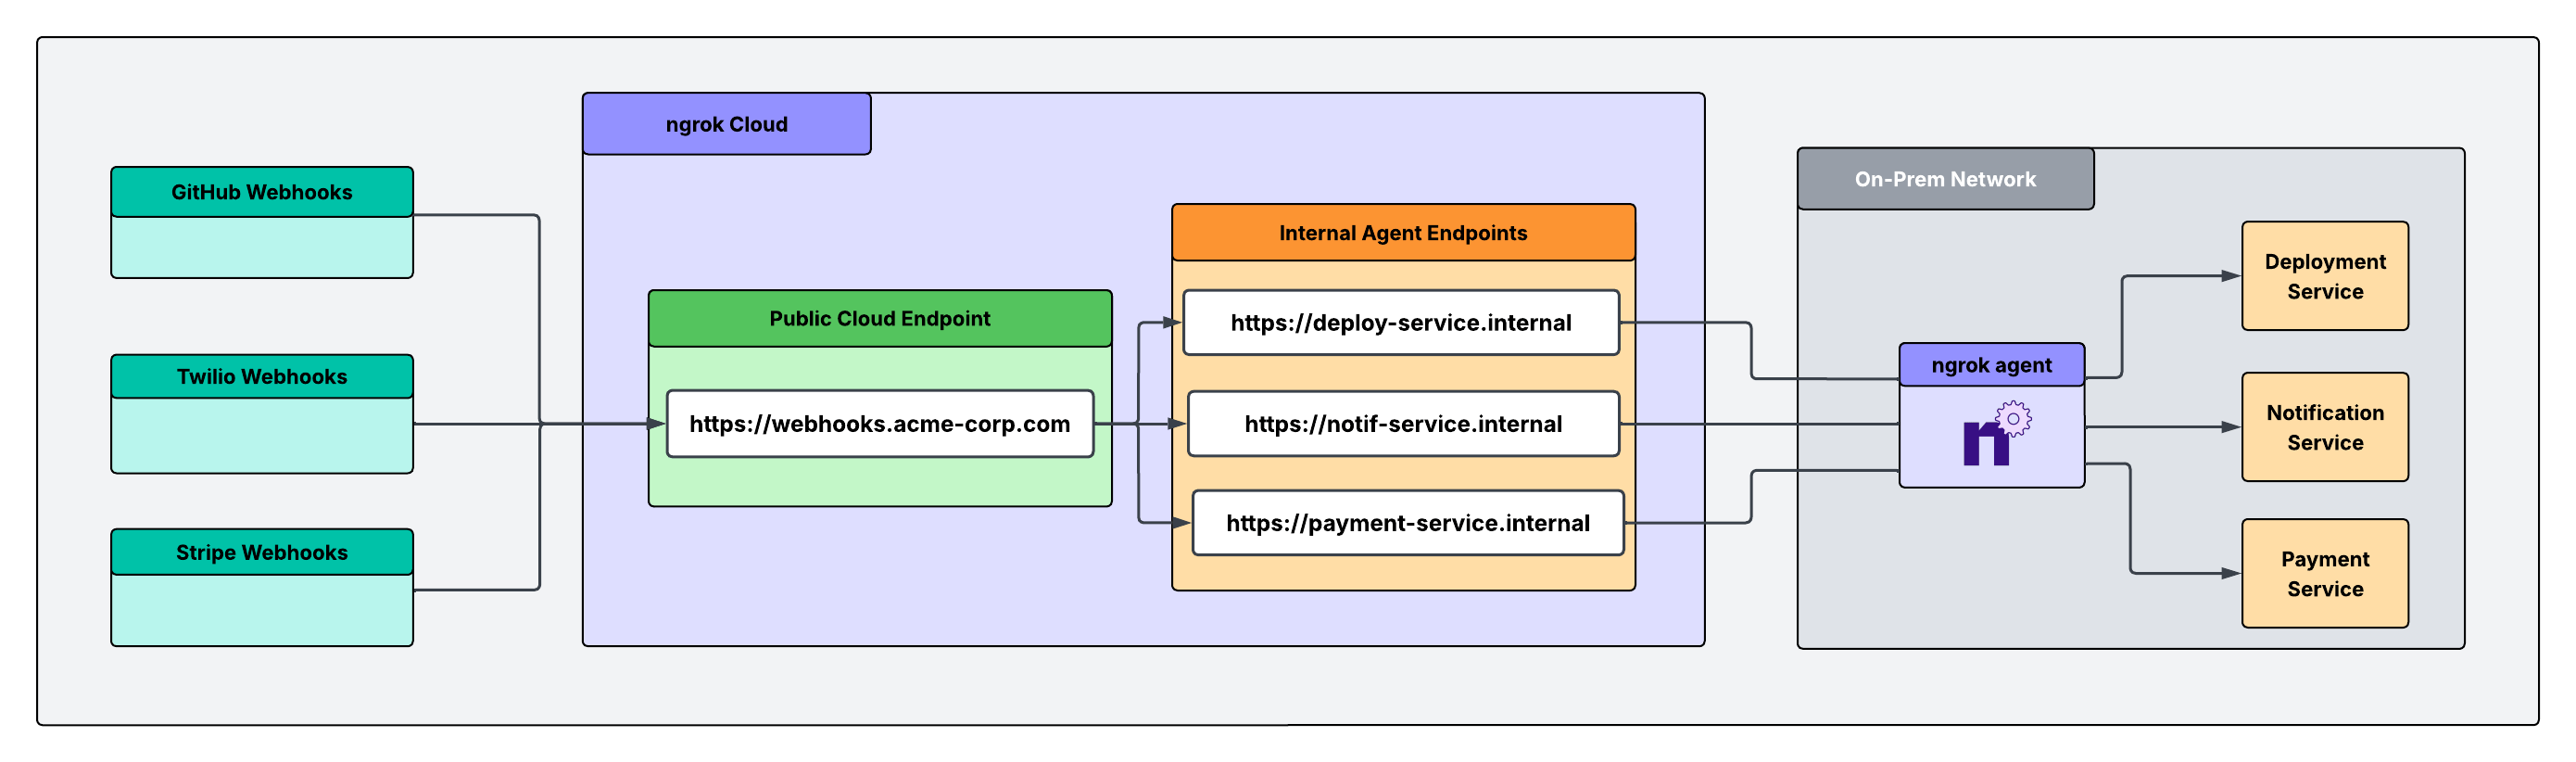
Three ways teams use this
The webhook gateway shape is the same for everyone. What differs is where your service runs and what you most need to guarantee:- Behind a firewall: Your service runs on-prem or in a private network that blocks inbound connections. Webhooks reach your port without you having to open inbound connections.
- Regulated workloads: Your service handles PHI or other regulated data, often in a cloud container. The path has to be end-to-end encrypted and must not capture or store payloads.
- Platform-governed: A platform team owns service configuration, access, and auth from a single surface. Endpoints and policy are declared as version-controlled config, and agents are scoped so developers can’t create shadow exposure.
Tutorial
What you’ll need
- An ngrok account. If you don’t have one, sign up.
- The ngrok agent, one of the SDKs, or the Kubernetes Operator installed where your service runs.
- The webhook signing secret for each provider you want to verify. You can find these in each provider’s developer dashboard.
- (Optional) The ngrok agent CLI if you want to create a vault for your webhook secrets.
1. Give the receiving service a private address
Each service that handles webhooks gets an internal Agent Endpoint: a private address that only receives traffic when it’s forwarded through theforward-internal action. Internal endpoint hostnames must end with .internal.
How you create it depends on where the service runs.
- On a server or VM
- In a cloud container
- In Kubernetes
Run the agent next to your service. It connects outbound over TLS on port 443, so nothing needs to change on the firewall.
notif-service.internal and deploy-service.internal.
2. Create the front door
Navigate to the Endpoints section of the dashboard, click New +, then Cloud Endpoint, and enter the domain you want to use for your public URL. (In Kubernetes, you can create this as aCloudEndpoint resource instead.)
3. (Optional) Store your signing secrets in a vault
Each route verifies a provider’s signature using that provider’s signing secret. For production, keep those secrets in Secrets for Traffic Policy so they’re encrypted and referenced by name rather than pasted in plaintext. This step is optional, but a vault keeps secrets out of your policy source and lets you rotate them without editing routes.$VAULT_ID to match the vault ID returned above:
4. Verify the sender and route inward
On your Cloud Endpoint’s Traffic Policy, each rule matches a provider by request path, verifies the signature withverify-webhook, and forwards verified requests to the matching internal service with forward-internal. A request with a bad or missing signature is rejected with a 403.
- Using vaults and secrets
- Using plaintext secrets
5. Add the guardrail your use case needs
The front door verifies and routes for everyone. Layer on additional security depending on what you need most.- Behind a firewall
- Regulated workloads
- Platform-governed
Nothing more is required: the agent’s connection is outbound-only over port 443, and your
.internal services are only reachable through forward-internal.6. Configure your webhook URL at each provider and test
Add your ngrok URL and provider-specific webhook path within each provider’s dashboard:- GitHub:
https://$NGROK_DOMAIN/github - Twilio:
https://$NGROK_DOMAIN/twilio - Stripe:
https://$NGROK_DOMAIN/stripe
Verifying a provider that isn’t on the supported list
verify-webhook supports a fixed set of providers. If your webhook provider isn’t on the list, here are your options:
Use a Traffic Policy expression
If the provider authenticates by sending a static secret in a header or query parameter, check for the header in a Traffic Policy expression and reject anything that fails:restrict-ips action locked to the provider’s published IP ranges or with jwt-validation if the webhook arrives as a signed JWT.