Our Traffic Policy engine is designed to be flexible and expressive. We have 100+ variables for writing expressions or interpolation, with more to come. More than a dozen ways to take action on traffic… with more to come.
That flexibility and expressiveness helps you do simple, complex, and creative things, like controlling traffic or configuring complex routing topologies in just a few lines of YAML or JSON, but it also creates a sharp learning curve for writing your first few Traffic Policy rules.
Here’s a secret straight from how we demo ngrok’s Traffic Policy with customers: You can use custom responses to experiment with and learn about Traffic Policy rules faster in a simple environment.
Almost like a developer environment for Traffic Policy itself.
How the custom-response action works
This Traffic Policy action returns a hardcoded response back to the client that made a request to your endpoint.
Most importantly, when you use this action on the on_http_request phase, this hardcoded response comes straight from the ngrok network—no backends or upstream services required.
Custom responses are also a terminating action, in that after the Traffic Policy engine triggers one, it won’t run any subsequent actions.
It’s the end of the road.
We initially imagined custom responses being most useful for situations like returning a custom HTML maintenance page for all requests on your endpoint:
on_http_request:
  - actions:
      - type: custom-response
        config:
          status_code: 503
          body: "<html><body><h1>Service Unavailable</h1><p>Our servers are currently
            down for maintenance. Please check back later.</p></body></html>"
          headers:
            content-type: "text/html"
As we wrote more Traffic Policy rules to show prospective customers or publish on this very blog, like advanced routing topologies or tweaking headers in every way imaginable, we realized the custom-response action was also a fantastic shortcut. Because of the terminal quality of the action, you can make it act like a very simple upstream service. That allows you to develop and test Traffic Policy rules without first standing up an upstream service, an ngrok agent, and a public endpoint.
Time to get it working yourself.
Debug your policies with custom responses
If you haven't yet reserved a domain on ngrok, start there.
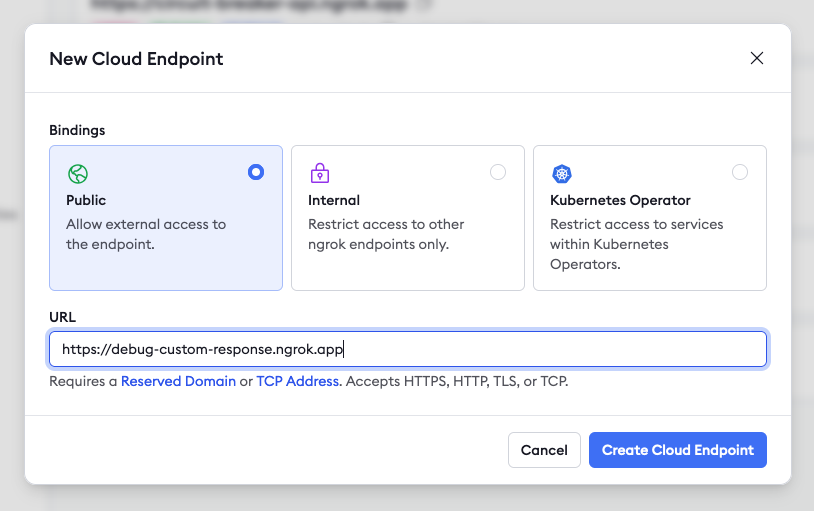
Head over to the Endpoints section of your ngrok dashboard, then click + New and New Cloud Endpoint. Leave the binding as Public, then enter your reserved domain name.

Enter in a basic custom response:
on_http_request:
  - actions:
      - type: custom-response
        config:
          status_code: 200
          body: "This. Is. Traffic Policy!"
          headers:
            content-type: "text/html"
Click Save to apply the rule to your new cloud endpoint.
In a terminal or your browser, send a request to your endpoint to see your custom response. You can also try out mine, which is available persistently at https://debug-custom-response.ngrok.app/.
With this custom response as your terminating rule, masquerading as a functional upstream service and connected ngrok agent, you can develop and test additional rules at will.
Test load balancing with rand.int() and custom responses
Let’s say you want to load balance between two upstream services (maybe even ones available on internal endpoints?) and wonder if our new rand.int() macro will do the trick.
With this rule, every request generates a random integer between 0 and 10, and if it’s less than or equal to 5, it points to “endpoint B.” In all other cases, the rule falls back to your original custom response.
Update your cloud endpoint with the following:
on_http_request:
  - expressions:
      - "rand.int(0, 10) >= 5"
    actions:
      - type: custom-response
        config:
          body: "Howdy from endpoint B."
          headers:
            content-type: "text/html"

  - actions:
      - type: custom-response
        config:
          body: "Endpoint A here! Nice to meet you."
          headers:
            content-type: "text/html"
Click Save again and hit your endpoint a few times to see it vary between the two responses, giving you quick validation that this will work for your needs.
Or feel free to try out my public endpoint showcasing this behavior: https://debug-custom-response-ab.ngrok.app/.
Ready to go from custom responses to real ones?
When you’re ready to take the Traffic Policy rules you’ve developed into production, you can replace any terminal custom responses with the real actions you’d like to implement, like requiring JWT validation through Auth0, rate limiting specific types of traffic, and much more.
You can even convert your quick experiments into production routing topologies with internal endpoints and the forward-internal action:
on_http_request:
  - expressions:
      - "rand.int(0, 10) >= 5"
    actions:
      - type: forward-internal
        config:
          url: "https://endpointB.internal"

  - actions:
      - type: forward-internal
        config:
          url: "https://endpointA.internal"
If you’d like to see more examples of developing Traffic Policy rules this way, why not sign up for Office Hours and send in a question? Our DevEd and Product folks would be thrilled to put together some fun demos showing off macros, variables, and actions—but we can only do that if you ask us ahead of time!
📣 Lastly, shout-out to Niji (PM) and Alan (you know, our CEO) for shepherding this style of testing and demoing ngrok's API gateway features!