Software teams need to work quickly, securely, and collaboratively. They need to focus on building solutions that make their products unique and worry about as few infrastructure details as possible. That includes providing ingress to the services they’re building. Whether they’re developing on their laptop at home, behind a corporate firewall, or deploying to the cloud, they need to provide secure access to their services.
In this guide, we want to talk about how ngrok and Cloudflare Tunnels share the same core feature set, but with ngrok you can be easily integrated into your tech stack and run as a service, as an interactive CLI, as an SDK embedded in your app, and even as a Kubernetes Ingress Controller. You have a lot of choices in how to bring secure connectivity to your dev/test or production environments with ngrok. ngrok is also being leveraged by our customers to access external networks they don’t control - such as a customer’s network.
If you’re a current user of Cloudflare Tunnels and looking to make the move to ngrok, this guide will help you make the transition.
Make the move: Migrate from Cloudflare to ngrok
One of the first things you probably need to think about is how your current configuration will relate to the new system.
A common config.yml for Cloudflare Tunnels may look something like this, where you have a tunnel identified by an ID, a URL, and a credentials-file field with a path to the JSON file containing the Cloudflare credentials for the tunnel.
url: http://localhost:8000
tunnel: <Tunnel-UUID>
credentials-file: /root/.cloudflared/<Tunnel-UUID>.json
Remember when you created that tunnel in Cloudflare, you needed to run a create command in their CLI, find the UUID of the created tunnel, take that UUID and write the config.yml that mapped the Tunnel-UUID to a local URL, then run another command to match that tunnel to assign a CNAME record that directed traffic to the tunnel subdomain.
Ways to use ngrok
With ngrok, you can create and configure connections in various ways, whether it’s entirely through the ngrok agent CLI, or using a combination of the CLI and `ngrok.yml` configuration file. You can also embed ngrok in your application code with one of our native libraries like ngrok-go or ngrok-rust. Or, you can provide ingress to your clusters with the Kubernetes Ingress Controller for ngrok.
For this post, we’ll focus on using the ngrok CLI and ngrok.yml config file, which are similar to the Cloudflare Tunnels setup.
What you’ll need to know to create tunnels in ngrok is the port your service is running on and the domain you want to use.
Connect the ngrok agent
After signing up for an ngrok account and installing the ngrok agent, you need to connect the agent to your account. You do this by taking the ngrok authtoken shown in your ngrok dashboard and pasting it into the following command in your terminal.
ngrok config add-authtoken <TOKEN>This command writes the authtoken to your ngrok.yml config file to be used with all your interactions with the ngrok platform.
At this point, you are ready to use ngrok.
Assuming you have an application listening on port 80 on your machine, you could run the following and create a secure connection from the internet to that port.
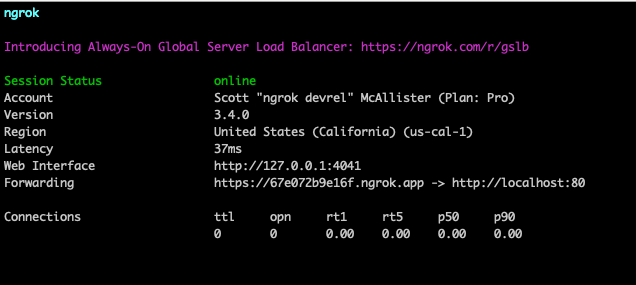
ngrok http 80The resulting message from ngrok would look like this:

Now, all traffic sent to https://67e072b9e16f.ngrok.app is passing through the ngrok infrastructure which will take care of all the necessary DNS entries, TLS certificates, load balancing, DDoS protection, and everything else needed to create the connection and securely route traffic to port 80 on my machine.
Simultaneous success
Using the ngrok.yml configuration file, you can run multiple tunnels simultaneously and tap into more advanced settings.
Defining tunnel configurations is helpful because you may then start pre-configured tunnels by name from your command line without remembering all of the right arguments every time.
You may also use this method to start as many tunnels as you like from a single ngrok agent.
To find your config file, run the following command:
ngrok config checkOpen the file at the path returned using your favorite text editor.
Tunnels are defined as a mapping of name -> configuration under the tunnels property in your configuration file.
For example, if you wanted to create two tunnels named httpbin and demo the configuration would look like this:
tunnels:
  httpbin:
    proto: http
    addr: 8000
    domain: alan-httpbin.ngrok.dev
  demo:
    proto: http
    addr: 9090
    domain: demo.inconshreveable.com
    inspect: false
These two tunnels accept HTTP traffic, defined by proto: http. ngrok routes the requests to the port defined in addr.
And, those requests are accessed at the domain values provided.
You can set an ngrok subdomain, like domain: alan-httpbin.ngrok.dev as seen in httpbin, or use your own custom domain like demo: demo.inconshreveable.com in the demo config.
There are a host of other configuration settings you can define for each tunnel that you can learn about in the Tunnel configurations documentation.
Once you have your tunnels defined, all you need to do to start it is call the tunnel by name in the following command:
ngrok start httpbinLearn more about secure ingress with ngrok
As I mentioned, this is only one way to create ingress to your applications. If you’re Interested in learning more about how you could utilize ngrok in production by using one of our agent SDKs like ngrok-go or ngrok-rust, or if you’d like to learn about using the ngrok Ingress Controller for Kubernetes, we’ve got you covered with some other awesome content from the ngrok blog:
- Kubernetes ingress with ngrok and HashiCorp Consul
- Integrating OAuth into your Rust App
- Build and test a CRUD app in Go
Questions or comments? Hit us up on X (aka Twitter) @ngrokhq or LinkedIn, or join our community on Slack.