A few months ago, I had the opportunity to play with Zoom Apps. Before I dug in, I assumed Zoom would give an app a little information about an active or scheduled meeting, a little more on the user profile, let you manipulate a meeting, and call it a platform. Frankly, I couldn’t have been more wrong.
When I dove into Zoom Apps and started playing, I could access and manipulate data in real time but then use that to trigger other activities such as looking up attendees, updating profile information, changing call status. What started as exploration turned into a flood of new ideas.
What is a Zoom App?
A Zoom App is an app that can act within the context of your Zoom meetings and overall account. Most app marketplaces have similar concepts and generally limit the scope of what you can do. That’s where Zoom Apps are quite a bit different. To get started, visit the Zoom Developer Portal to log into your developer account and create your app. During the initial app creation process, you get a handful of options, each tied to specific use cases:
If you were building a “Sign in with Zoom” capability, you’d choose the simple OAuth app type and set up an OpenID Connect-type authentication flow. Alternatively, if you just wanted a passive listener app that reacted to changes within your account or calls, you could create a Webhook Only. For my App, I chose a generic “Zoom App” as I was starting with a sample app - https://github.com/caseysoftware/zoomapps-sample-js - and wasn’t sure which way I wanted to go later.
Note: To add a Zoom App to your account, you need your account admin to authorize it so you may need to use a personal account as Host. Luckily, participants on a call can still leverage Host’s apps.
Creating your Zoom App with ngrok
Setting up your Zoom App only takes a moment. Give it a name and hit Create. The next steps are key and the first place you connect to ngrok.
First, set your Home URL to your base ngrok url. This is much easier if you have a static subdomain through a Personal or Pro plan. Next, set the “Redirect url for OAuth” to your base ngrok url with “auth” appended. Then add the base url to your “OAuth allow list” Together, these urls will look like:
- Home URL: https://yourcustomsubdomain.ngrok.io
- Redirect URL for OAuth: https://yourcustomsubdomain.ngrok.io/auth
- OAuth allow list: https://yourcustomsubdomain.ngrok.io
Next, add “ngrok.io” to your “Domain allow list.” At this point, the Zoom App config will display a message warning you that developer tools are not allowed for published apps. Ignore the warning for now but before putting this app into production, you’ll want to set a custom domain for your ngrok tunnel.
Now to enable our app to take action, we’ll need to give it permission to access to both features and data. Under App Features, select “Add APIs” and give it access to “shareApp” so we can share a screen within our app. Under Scopes, choose zoomapp:inmeeting.
This is the second place I was impressed by Zoom Apps: the flexibility.
Zoom Apps: Configuring API, Event, and Scope Access
The Zoom API has numerous endpoints and capabilities and you can grant fine-grained control over which your app can access. My favorite is currently “setVirtualBackground” and “removeVirutalBackground” for the sheer amusing things I can do with both.
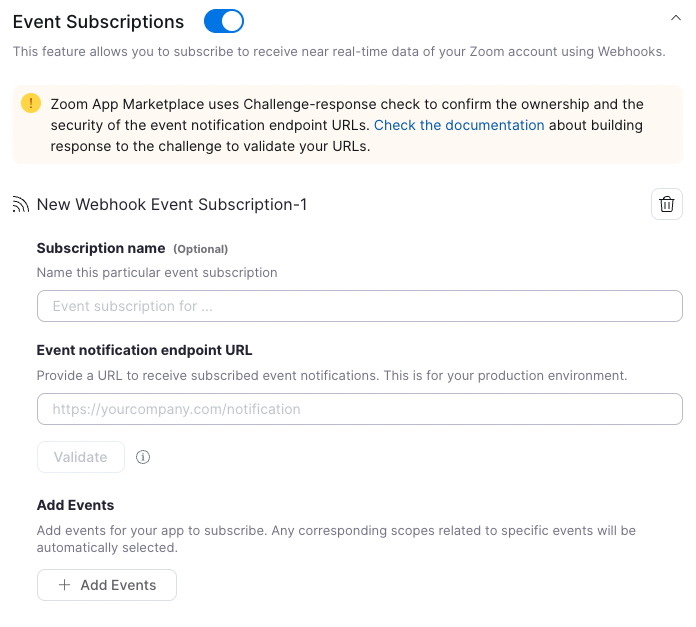
Once you move past the API into the Events, you can activate Event Subscriptions and configure which are broadcast to your app via webhooks. This gives you tight control over what your app knows about within the system and even allows you to specify broadcasting different events to different webhook listeners. In exploring this one, it looked like splitting different classes of events - meeting events vs chat events - into different channels for lighting up different use cases over time.

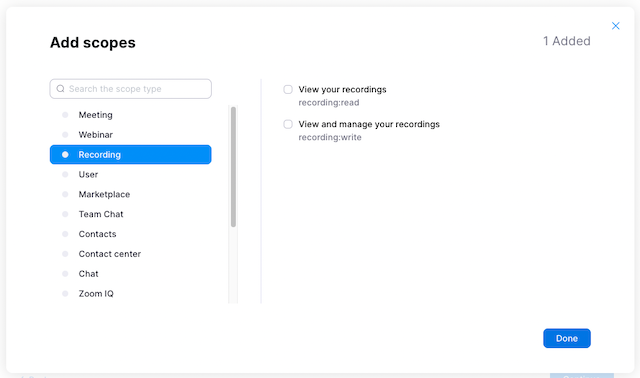
Finally, you have the OAuth Scopes themselves. These scopes allow your app to access and possibly modify your Zoom context whether it’s your overall account, a specific meeting, or supporting resources such as recordings. In this case, we’re only scratching the surface but there’s plenty of room to explore and play..

Updating your Zoom App to handle webhooks
Now that our Zoom App is configured on Zoom side, we need to modify the app to accept and process the incoming requests.
Within app.js - the full file is here - we’ll add two lines. First, we’ll import the route to the list of routes (line 14 in the linked file):
import notificationRoutes from "./server/routes/notification.js";And then we’ll set a controller to map a url route to the controller:
app.use("/notification", notificationRoutes);Then we’ll create /server/routes/notification.js (full file) with the actual processing logic which handles the incoming event. Based on our configuration above, we’re only receiving presence and sharing changes so this handler extracts the email address of the user referenced in this event and the change itself.
Connecting Zoom to your Zoom App with ngrok
Now that our app has the additional logic and Zoom is configured, we have to set up the app and Zoom to communicate.
First, we copy the .env.sample file in our repository to .env and get the Client Id and Secret from our Zoom App configuration. We can copy and paste and go. This ensures our App can talk to Zoom and now we can start it on the default port (3000) with:
NODE_ENV=production npm startNow to make sure Zoom can talk to our app, we start ngrok as usual via a second terminal:
ngrok http 3000Now if all is working as expected, watch your first terminal - the one you started node in - and start a Zoom meeting, have another device join it, share your screen, etc. On each change, you should see a log message noting the change and the email of the user who did it.
Securing your Zoom App with ngrok
Now that we have traffic flowing between Zoom and our application, we could modify the context of our accounts, meetings, recordings, and more. While we kept permissions tightly configured this time, we can’t just depend on people not discovering the url for our app, we need to secure it.
There are a variety of approaches to securing our app. We could have the app itself do webhook verification but unless you’re using the vendor’s SDK - we’re not in this case - it’s deceptively complicated. Even worse, if your app is already in production, your team may have moved onto other projects and you don’t have the time to add new capabilities. Instead of modifying the app, let’s modify the connection:
ngrok http 3000 --verify-webhook=zoom --verify-webhook-secret=mySecretBy adding those two parameters, we’re turning on Zoom webhook verification in the ngrok cloud and dropping invalid/unverified traffic long before it reaches our app without modifying the app. You can configure this via your ngrok Dashboard too. It doesn’t get much easier than that.
Next Steps with Zoom Apps and ngrok
Now that I have this flow of information - specifically which user is doing what - I have two use cases in mind:
First, I’d like to understand who joined the meeting when, who shared, and when they muted/unmuted, and spoke. It would be useful to understand who is engaging in meetings and who isn’t.
Second, I’m going to plug into the Marvel Comics API and modify people’s profile pictures to my favorite heroes and villains. I’ll save that for April Fools Day.
If you want to build and experiment on the app yourself, grab my app and have fun - https://github.com/caseysoftware/zoomapps-sample-js