Jun 21, 2023
Adding auth to applications seems easy at the surface, but it can quickly become a source of frustration once you need to deliver a production-grade solution with features for end-users — i.e. self-service sign-ups, account recovery, and social auth for multiple platforms — and for security — i.e. audit trail, live session management, and authorization policies.
Solutions like Auth0 provide this functionality out of the box, but its implementation is based on complex protocols — OAuth, OpenID Connect, and SAML — that can take some time to implement right. ngrok offers native integrations with auth solutions like Auth0 and additional features so you can deliver complete auth to your apps that makes both end-users and security happy in record time.
In this post, I’ll integrate ngrok to Auth0 and solve for these challenges.
Serving an application with ngrok
If you want to follow along:
-
Sign up to a free ngrok account and a free Auth0 account. Both free plans are very generous for your initial project.
-
If you want to use my sample application, you will need a computer with NodeJS and git installed.
To start, let’s start with a sample application. From the terminal, enter the following commands to clone and launch the app:
To confirm the app is up and running, launch your browser and go to http://localhost:3001.
Now we just need to serve this application via the ngrok ingress. To do so:
-
Sign up to a free ngrok account. You will be redirect to a get started page.
-
From the get started page, follow steps 1 and 2 to install the ngrok agent and set your access token
-
Now, just fire up the ngrok agent pointing to your sample application:
ngrok http 3001- ngrok will serve your application via the URL listed by the ngrok agent:
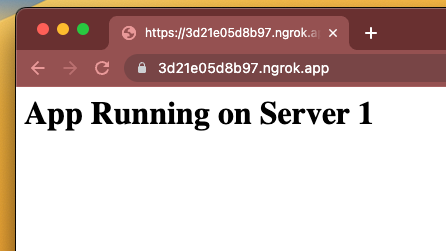
At the present moment, the access to my app is public.
But if you take a look at the sample app code (ngrok-tutorial/lesson1/app.js, lines 9-13), you will notice that my app is ready to receive a user name (in the name variable) and provide a warm greet whenever my app is served by ngrok with authentication at the edge:
1let name = req.header("ngrok-auth-user-name");2console.log(`Incoming request from ${name}`);3if (typeof name !== "undefined") {4 body += "Hi there " + name;5}Let’s add Auth0 authentication and make my app safe and more corteous!
Adding Auth0 authentication
-
From the Auth0 Administrative Dashboard, click Applications > Applications, and then click Create Application.
-
On the Create application popup, enter ngrok app as the application name, select the Single Page Web Application tile, and then click Create.
-
On the ngrok app page, click the Settings tab and copy the Domain, Client ID, and Client Secret values.
-
Enter https://idp.ngrok.com/oauth2/callback in the Allowed Callback URLs field, and enter the URL provided by the ngrok agent to expose your application to the internet in the Application Login URI field (i.e. https://myexample.ngrok.io).
- Click Save Changes.
Integrating Auth0 and ngrok
-
Return to the terminal where you ran ngrok and enter Ctrl + C stop the ngrok agent.
-
Launch the ngrok application again, replacing
AUTH0_OAUTH_URLwith the domain copied from Auth0 (i.e. https://dev-abcd1234.us.auth0.com/), AUTH0_CLIENT_ID with the client id from Auth0, and AUTH0_CLIENT_SECRET with the client secret copied from Auth0:
1ngrok http 3001 --oidc=AUTH0_OAUTH_URL \2 --oidc-client-id=AUTH0_CLIENT_ID \3 --oidc-client-secret=AUTH0_CLIENT_SECRET-
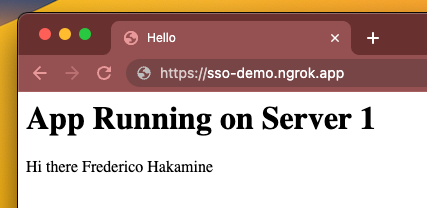
Copy the URL available next to forwarding and launch your app. You will be redirected for authentication with Auth0.
-
Sign up with a new account and complete the authentication.
-
You will see the sample app page with your registered name.
Adding different social auth platforms, auditing, observability, live session management, and much more
Now that your application is integrated, you can leverage both Auth0 and ngrok to all the additional features for the best user and security experience:
-
Customizing the Auth experience: The Auth0 documentation covers a rich set of features — like passwordless auth, self-service account recovery, and more — to enrich the login experience.
-
Adding URL-based authorization: The ngrok edge configuration (available from the ngrok dashboard), allows you to set specific authentication behaviors per url route. It also provides additional middleware modules for load balancing traffic, adding ip restrictions, and much more.
-
Monitoring live sessions: The ngrok dashboard also shows a live view of all logged sessions in your application via the app users. This view makes your connection identity aware and provide you the ability to audit and kill sessions in real time.
-
Auditing traffic: ngrok also sends traffic in real-time to observability systems like AWS and Datadog Logs. You can use that to both monitor your application availability and to audit login and other important traffic events for security and compliance.