Ingress to apps secured by Azure AD (Microsoft Entra ID) in Kubernetes
To use the ngrok Kubernetes Ingress Controller with Azure AD (Microsoft Entra ID):
The ngrok Kubernetes Ingress Controller is ngrok's official controller for adding secure public ingress and middleware execution to your Kubernetes apps with ngrok's Cloud Edge. With ngrok, you can manage and secure traffic to your apps at every stage of the development lifecycle while also benefitting from simpler configurations, security, and edge acceleration.
Microsoft Azure Active Directory (AD)—now known as Microsoft Entra ID (see the tip below)—is an identity and access management platform that helps administrators and DevOps engineers safeguard their organization's multicloud environment with strong authentication and unified identity management, whether they operate in Azure cloud or on-premises.
In October 2023, Microsoft Azure Active Directory (AD) was renamed Microsoft Entra ID to "communicate the multicloud, multiplatform functionality" and "alleviate confusion with Windows Server Active Directory." This name change changes nothing about the product or its capabilities. We have used Azure AD up to this point due to the recency of the change, but will use Entra ID for the remainder.
The ngrok Kubernetes Ingress Controller and Entra ID integrate by letting you not only route public traffic to an app deployed on a Kubernetes cluster, but also restrict access only to users who you have authorized through Entra ID.
With this guide, you'll (optionally) create a new Kubernetes cluster and example deployment and install the ngrok Kubernetes Ingress Controller to securely route traffic through the ngrok Cloud Edge. You'll then use the ngrok dashboard to enable Security Assertion Markup Language (SAML), using Entra ID as your identity provider, to authorize specific users with a single sign-on experience.
- An ngrok account at the pay-as-you-go or custom tiers.
- A Microsoft Azure account with access to an existing Entra ID tenant or the ability to create a new tenant with an Entra ID P1 or P2 license.
- A Kubernetes cluster, either locally or in a public cloud, with an app you'd like to be publicly accessible to specific users.
Step 1: Create a cluster and deploy an example app
This guide requires you to deploy some app on any Kubernetes cluster, either locally or in a public cloud, to provide an endpoint for ngrok's secure tunnel. You can use any cluster and any app, but for demonstration, we'll create a local Kubernetes cluster with minikube and deploy the Online Boutique example.
If you already have a cluster and app, skip to Step 2: Add the ngrok Kubernetes ingress controller.
-
Download the
GoogleCloudPlatform/microservices-demoproject to your local workstation and navigate into the new directory.git clone https://github.com/GoogleCloudPlatform/microservices-demo
cd microservices-demo -
Create a new minikube cluster.
minikube start -p online-boutique -
Apply the manifests for the Online Boutique.
kubectl apply -f ./release/kubernetes-manifests.yaml
Step 2: Add the ngrok Kubernetes ingress controller
Next, you'll configure and deploy the ngrok Kubernetes Ingress Controller to expose your app to the public internet through the ngrok Cloud Edge.
-
Add the ngrok Helm repository if you haven't already.
helm repo add ngrok https://ngrok.github.io/kubernetes-ingress-controller -
Create a ngrok static subdomain for ingress if you don't have one already. Navigate to the Domains section of the ngrok dashboard and click Create Domain or New Domain. This static subdomain will be your
NGROK_DOMAINfor the remainder of this guide.Creating a subdomain on the ngrok network provides a public route to accept HTTP, HTTPS, and TLS traffic.
-
Set up the
AUTHTOKENandAPI_KEYexports, which allows Helm to install the Ingress Controller using your ngrok credentials. Find yourAUTHTOKENunder Your Authtoken in the ngrok dashboard.To create a new API key, navigate to the API section of the ngrok dashboard, click the New API Key button, change the description or owner, and click the Add API Key button. Copy the API key token shown in the modal window before closing it, as the ngrok dashboard will not show you the token again.
export NGROK_AUTHTOKEN=[YOUR-AUTHTOKEN]
export NGROK_API_KEY=[YOUR-API-KEY] -
Install the ngrok Kubernetes Ingress Controller with Helm.
helm install ngrok-ingress-controller ngrok/kubernetes-ingress-controller \
  --namespace ngrok-ingress-controller \
  --create-namespace \
  --set credentials.apiKey=$NGROK_API_KEY \
--set credentials.authtoken=$NGROK_AUTHTOKEN -
Verify the health of your new Ingress Controller pod.
kubectl get pods -l 'app.kubernetes.io/name=kubernetes-ingress-controller'

NAME                                                              READY   STATUS    RESTARTS   AGE
ngrok-ingress-controller-kubernetes-ingress-controller-man2fg5p 1/1 Running 0 2m23s -
Create a new
boutique-ingress.ymlfile, which defines how the ngrok Kubernetes Ingress Controller should route traffic on yourNGROK_DOMAINto your Online Boutique app.tipMake sure you edit line
9of the manifest below, which contains theNGROK_DOMAINvariable, with the ngrok subdomain you already created. It should look something likeone-two-three.ngrok.app.If you are adding the ngrok Kubernetes Ingress Controller to a different deployment, you will need also change the
metadata.name,service.name, andservice.port.numbervalues to match your app's configuration. See the controller docs for additional details onspecsettings and common overrides.apiVersion: networking.k8s.io/v1
kind: Ingress
metadata:
name: boutique-ingress
namespace: default
spec:
ingressClassName: ngrok
rules:
- host: NGROK_DOMAIN
http:
paths:
- path: /
pathType: Prefix
backend:
service:
name: frontend
port:
number: 80 -
Apply the
boutique-ingress.yamlmanifest you just created.kubectl apply -f boutique-ingress.yamlGive your cluster a few moments to launch the necessary resources and for ngrok's Cloud Edge to pick up the new tunnel.
tipIf you see an error when applying the manifest, double-check that you've updated the
NGROK_DOMAINvalue and re-apply. -
Access your app, with ingress now handled by ngrok, by navigating to your ngrok domain, e.g.
https://one-two-three.ngrok.app, in your browser.
Step 3: Update your ngrok Edge to enable SAML
Your Kubernetes-based app is now publicly accessible through the ngrok Cloud Edge—to restrict access to only authorized users with proper Entra ID credentials, you first need to enable SAML on your Edge.
-
Navigate to the Edges section of the ngrok dashboard and click on the Edge created by the ngrok Kubernetes Ingress Controller. The domain name should match your
NGROK_DOMAIN, and you should see Created by kubernetes-ingress-controller in the edge's description.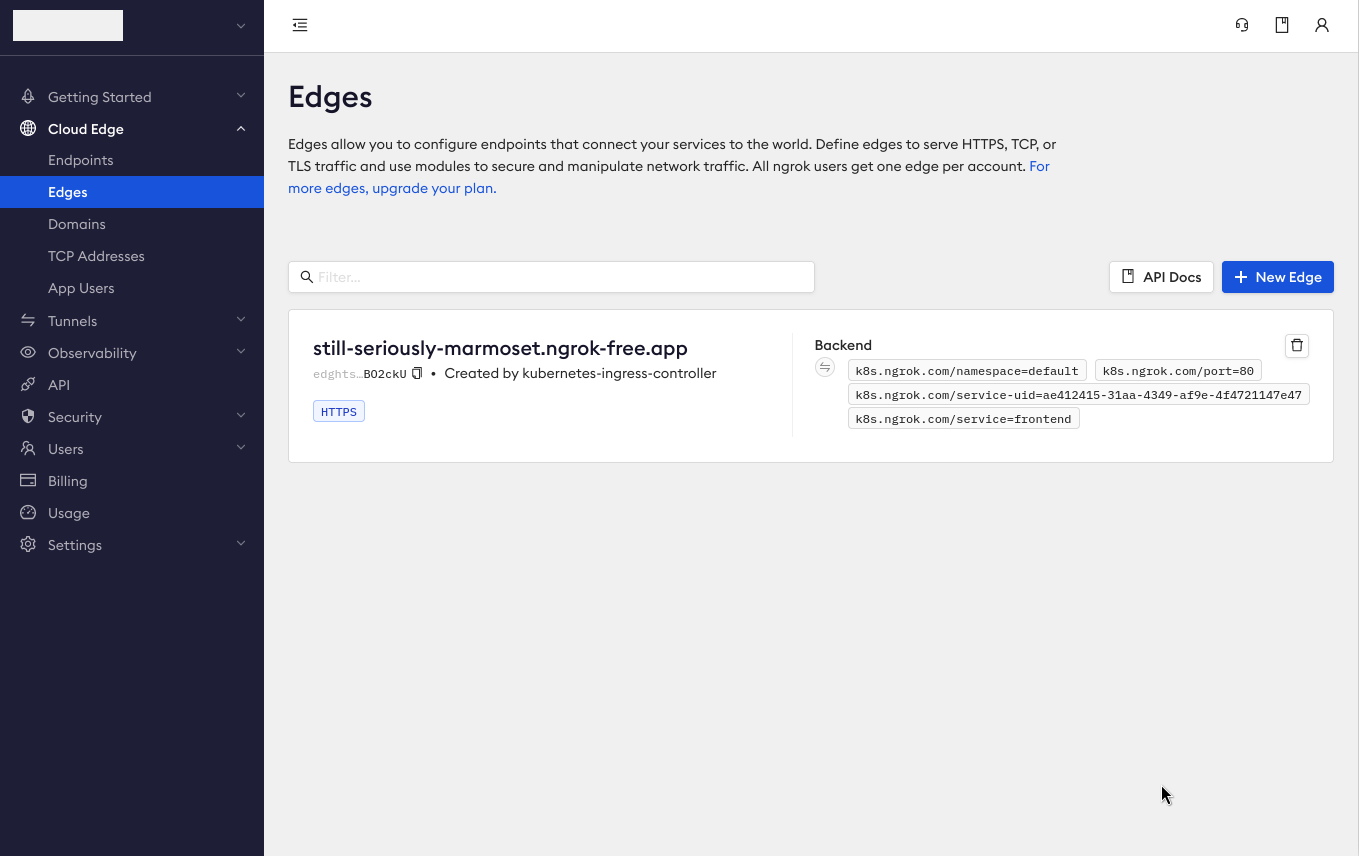
-
From the Overview, click Add SAML, then Begin setup.
-
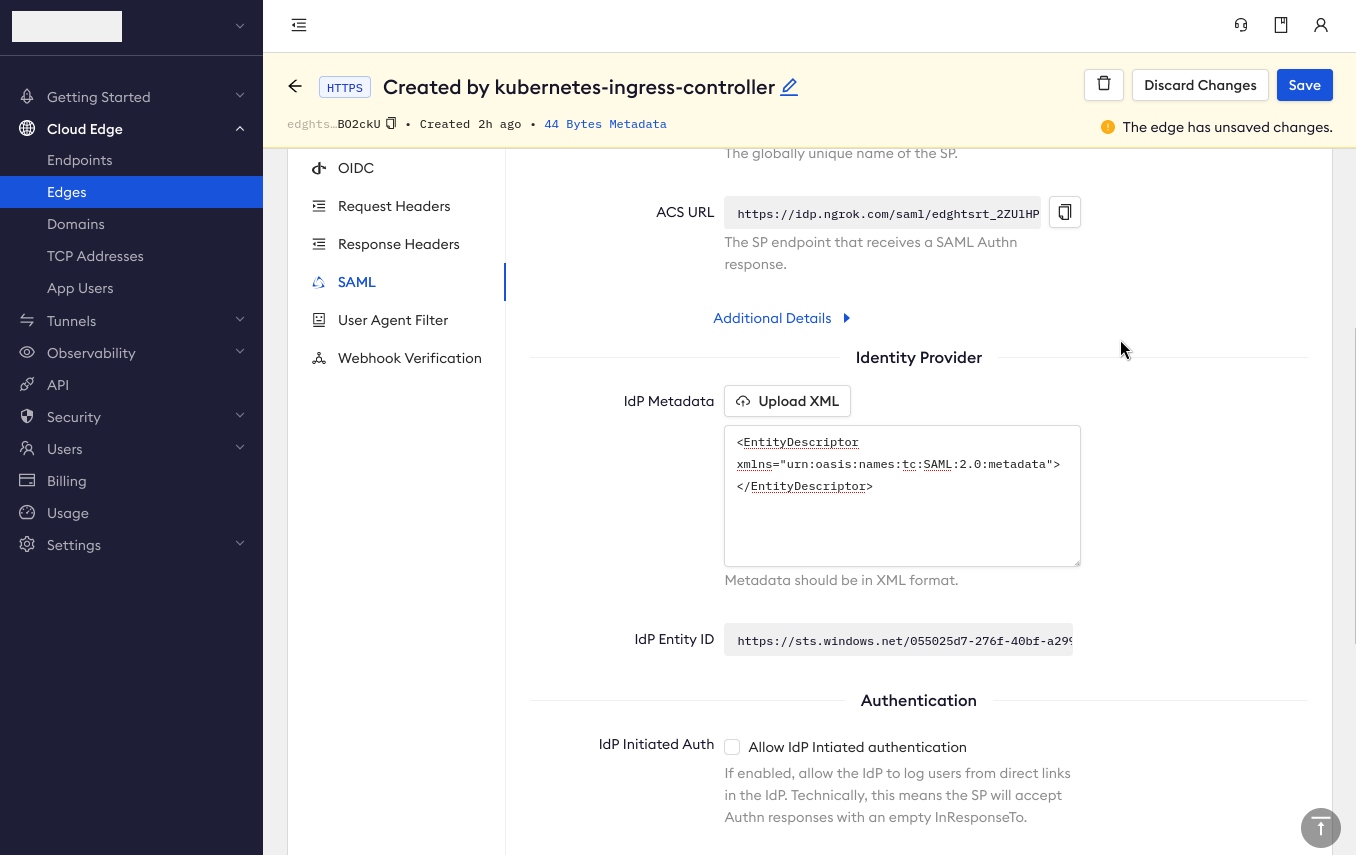
In the IdP Metadata textbox, add the following:
<EntityDescriptor xmlns="urn:oasis:names:tc:SAML:2.0:metadata"></EntityDescriptor> -
Click Save, at which point ngrok will update your SAML configuration with SP Metadata, Entity ID, and ACS URL values—you'll need these in the next step.
Step 4: Create an enterprise app in Microsoft Entra ID
With SAML configured on your ngrok Edge, you can now configure Microsoft Entra ID to operate as your identity provider, often called IdP.
-
Access your Entra ID tenant in the Azure console.
-
Click Enterprise applications in the left-hand sidebar, then + New application, and finally + Create your own application. Give your app a name—for our example,
online-boutiquewill work nicely, and make sure you've selected the Integrate any other application you don't find in the gallery (Non-gallery) option.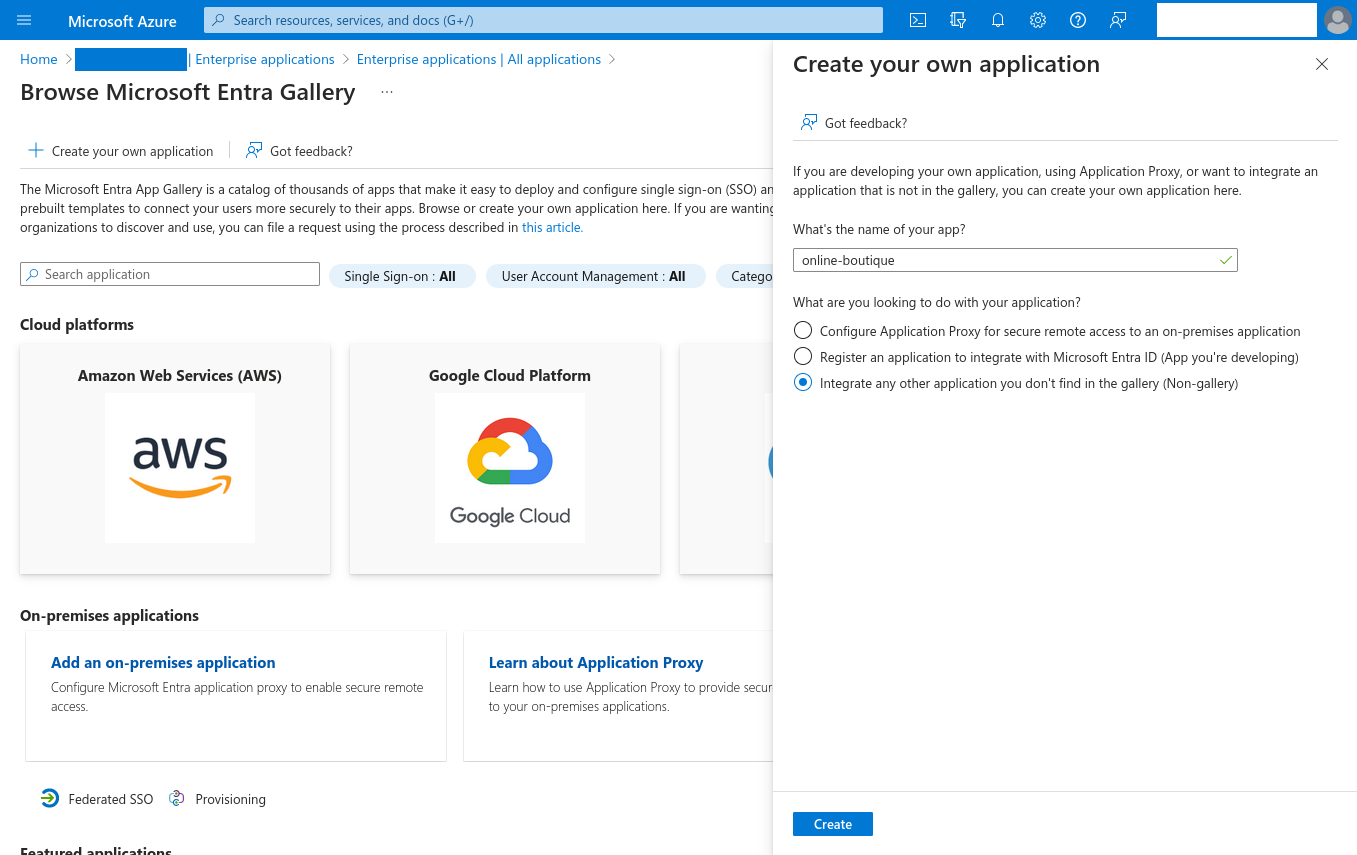
-
Click Create to build your enterprise app, which will take you to its Overview dashboard.
-
To provide specific users or groups access to your app, click Assign users and groups and follow the steps before heading back to the Overview.
-
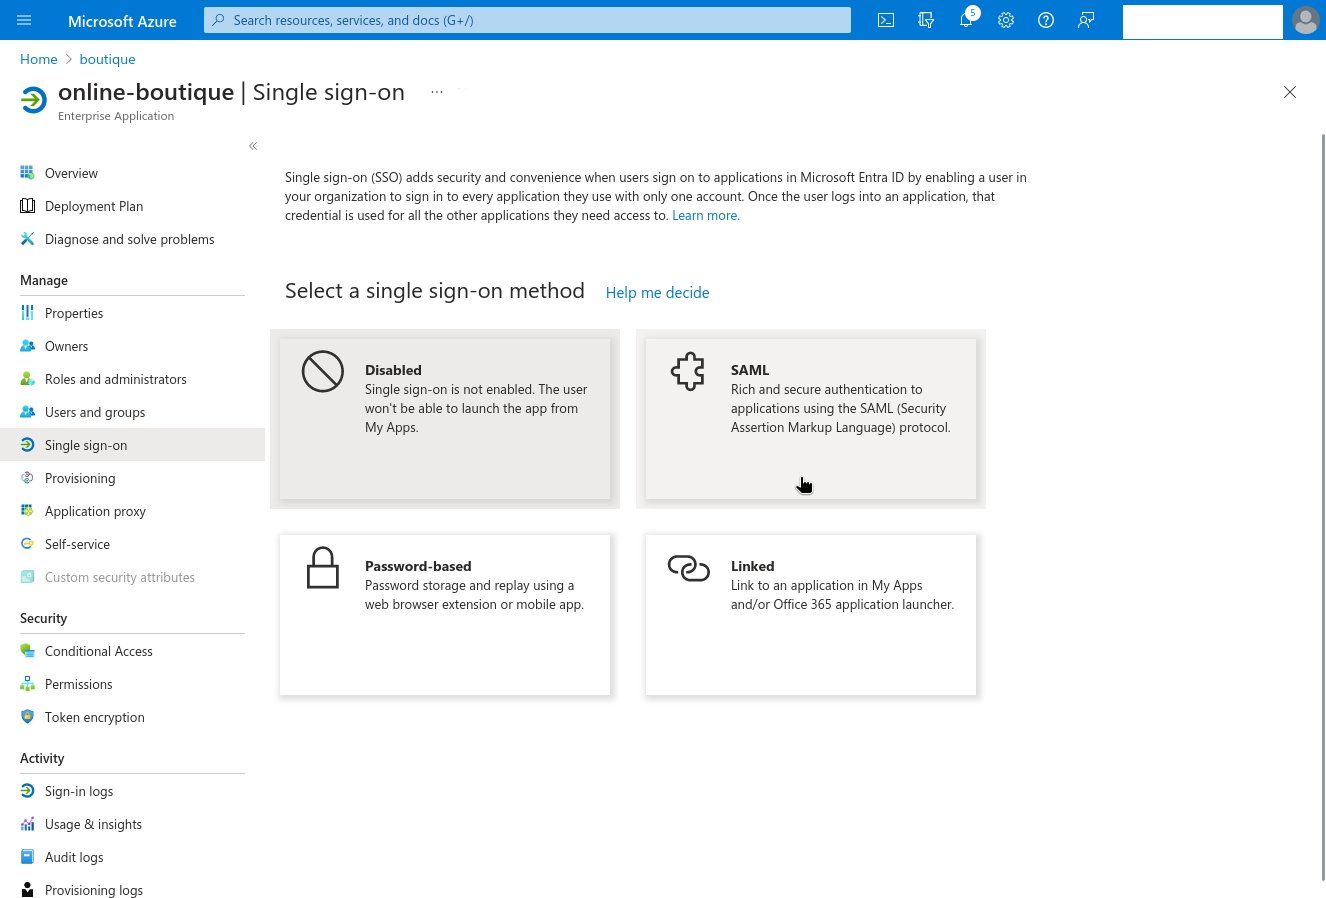
Click Set up single sign on to allow users to sign in to your app using their Microsoft Entra credentials, then choose SAML as your single sign-on protocol.
-
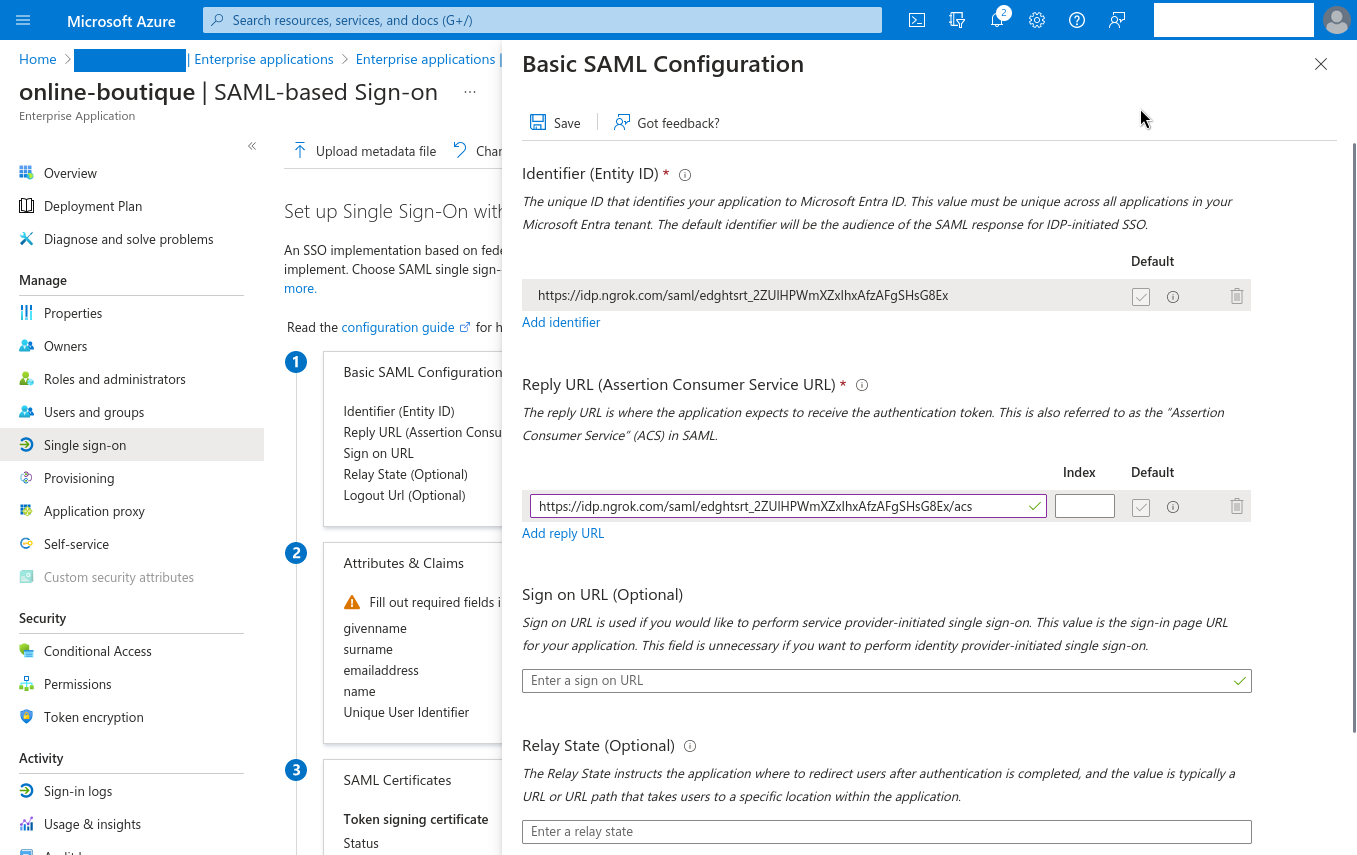
Click Edit in the Basic SAML Configuration box. Copy the Entity ID from ngrok into the Identifier (Entity ID) field, and the ACS URL from ngrok into the Reply URL (Assertion Consumer Service URL) field. Click Save before you close the modal.
-
In the SAML Certificates box, download the Federation Metadata XML.
Step 5: Finish adding Entra ID authorization to your ngrok Edge
Time to head back to your ngrok dashboard to finish the SAML configuration.
-
Update the IdP Metadata field by clicking Upload XML and choosing the
.xmlfile you just downloaded.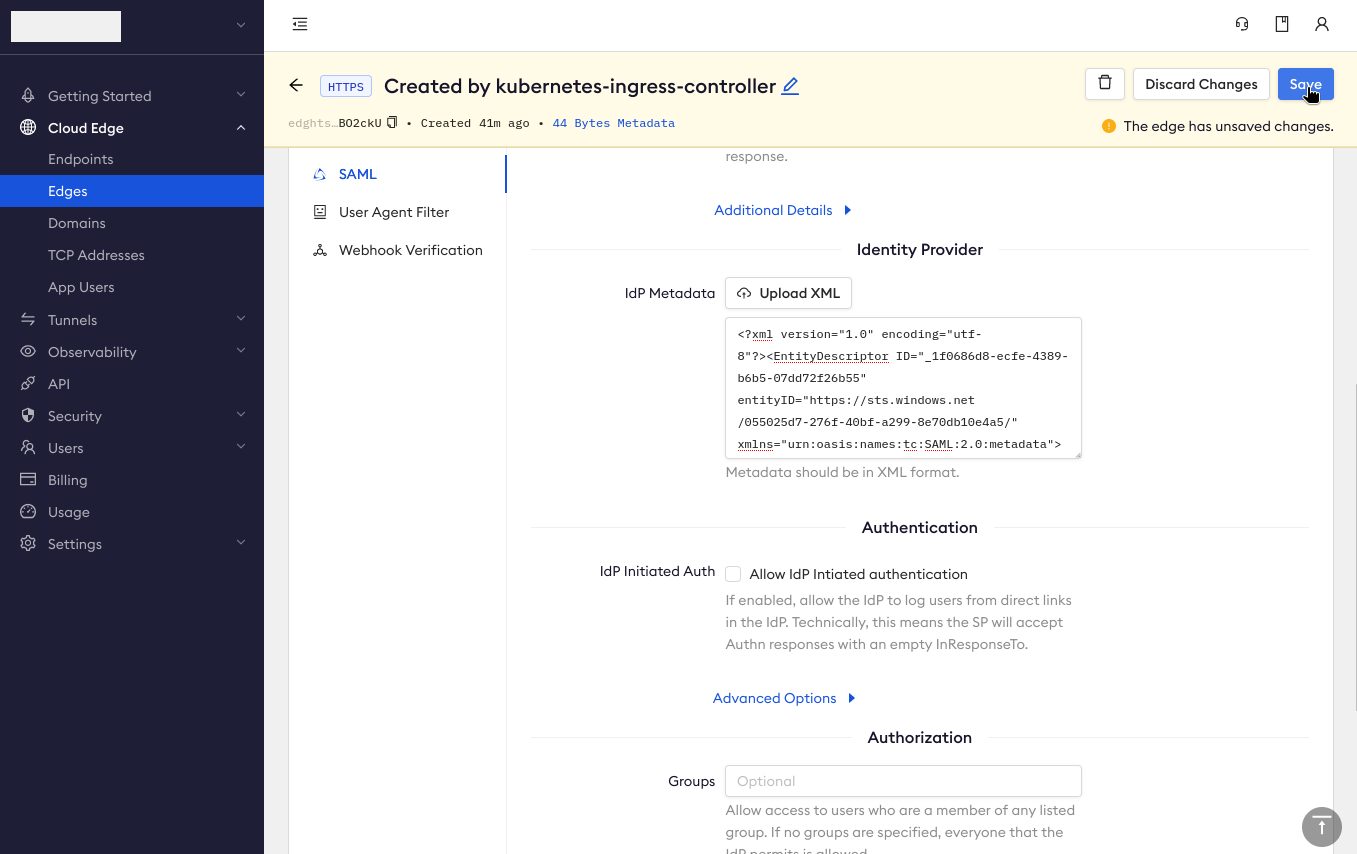
-
Click Save.
Step 6: Test authorization to your app using Microsoft Entra ID
You've finished integrating the ngrok Kubernetes Ingress Controller and Microsoft Entra ID! Your app, whether the Online Boutique used throughout this guide or a custom deployment, is now publicly accessible only to those authorized with their Entra ID credentials. Time to test how it works:
-
Open an incognito/private window in your browser, or a different browser than you've used so far, and navigate again to your
NGROK_DOMAIN. You should see a single sign-on screen from Microsoft.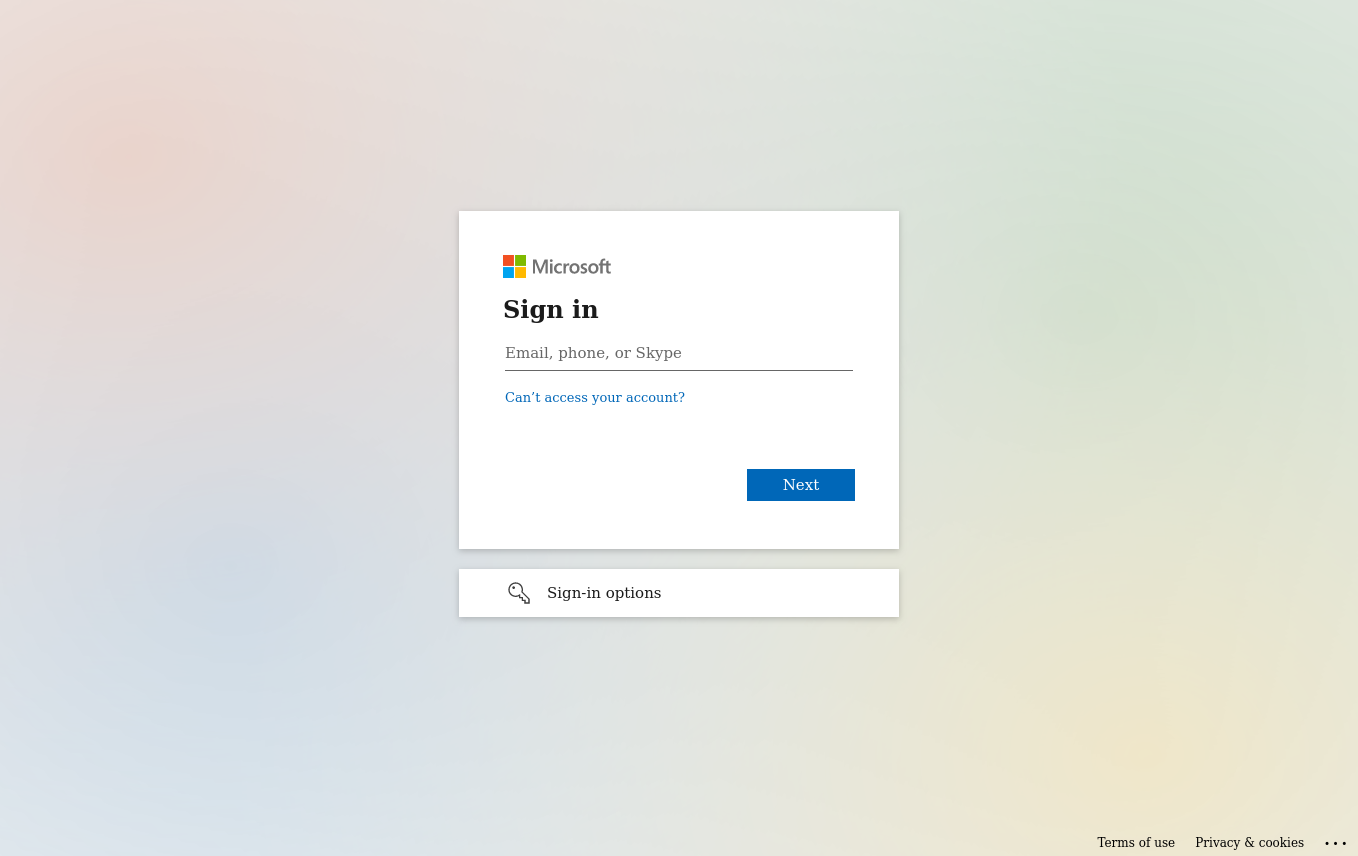
-
Enter credentials for a Microsoft account you assigned, either as an individual user or a group, to your enterprise application in Entra ID during step 4.
Behind the scenes, ngrok requests your identity provider, Microsoft Entra ID, for authentication. Once you sign in, or are already logged in, Entra ID then returns a SAML assertion to ngrok, telling ngrok your authentication is confirmed and you have authorization to access the app.
Entra ID will then redirect you back to your app!
What's next?
You've now integrated the ngrok Kubernetes Ingress Controller with Microsoft Entra ID to restrict access to your app to only authenticated users. With ngrok operating as middleware, handling both ingress to your Kubernetes cluster and the handshake with an Entra ID as an identity provider, you can deploy and secure new apps in a multi-cloud environment using your existing Microsoft/Azure identity and access management settings.
From an end user perspective, they only need to sign in once, using their Microsoft credentials, to authenticate themselves and access any number of applications you manage using Entra ID.
From here, you have a few options:
Clean up
If you created a local cluster with Minikube to launch the Online Boutique demo app, you can delete the cluster entirely:
minikube delete -p online-boutique
ngrok will delete your Edge automatically. To restore your previous authorization settings, head back to Microsoft Entra ID to delete your enterprise application.
Extend your ngrok Kubernetes Ingress Controller and Microsoft Entra ID integration
ngrok can manage multiple routes on a single Edge, allowing you to configure name-based virtual hosting or route modules to secure multiple apps with a single sign-on experience.
Custom domains and a circuit breaker are also good next steps to make your integration production-ready.
Learn more about the ngrok Ingress Controller, or contribute, by checking out the GitHub repository and the project-specific documentation.