miniOrange Endpoint SSO (OpenID Connect)
This guide refers to using SSO to authenticate access to your endpoints. You cannot use these instructions to set up SSO for logging into your ngrok account in the dashboard.
To secure access to ngrok with miniOrange Single Sign-On using OpenID Connect:
This article details how to configure miniOrange as the primary Identity Provider for ngrok tunnels. By integrating miniOrange SSO with ngrok, you can:
- Restrict access to ngrok tunnels only to users authenticated via miniOrange.
- Use miniOrange security policies and MFA authenticators.
- Use miniOrange's Dashboard to facilitate access to ngrok apps.
Supported Features
The ngrok integration with miniOrange supports:
- SP-Initiated SSO: In this mode, users access ngrok edges and tunnels and are redirected to miniOrange for authentication.
Requirements
To configure ngrok tunnels with miniOrange, you must have:
- a miniOrange account with administrative rights to create apps.
- an ngrok Enterprise Account with an authtoken or admin access to configure edges with OpenID Connect.
Configuration Steps
To integrate ngrok with miniOrange SSO, you will need to:
- Configure miniOrange with the ngrok app.
- Configure ngrok with the SSO settings provided by miniOrange.
Step 1: Configure miniOrange
-
Access miniOrange, and sign in using your miniOrange administrator account.
-
On the Dashboard page, click Apps on the left menu, click Add Application, click the OAUTH/OIDC tile, and then click the OAuth2/OpenID Connect tile.
-
On the Add App page, enter
ngrok OIDCin the Client Name field, enterhttps://idp.ngrok.com/oauth2/callbackin the Redirect-URL field, and then click Save.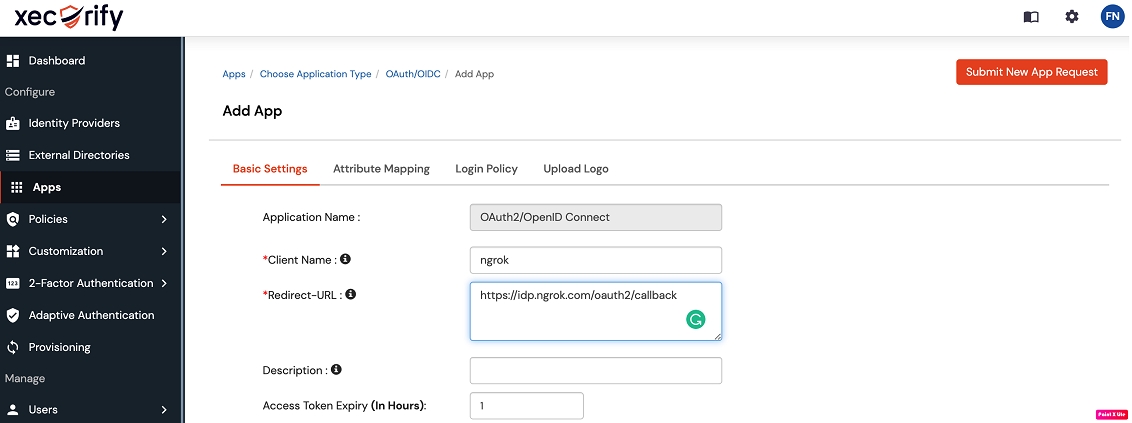
-
On the View Apps page, click Select in the ngrok OIDC app line, and then click Edit.
-
On the Edit Application page, make note of the value of the Client ID field, click the Click to reveal client secret link, and then make note of the value of the Client Secret field.
-
Click Save.
-
On the View Apps page, click Select in the ngrok app line, and then click OAuth Endpoints.
-
On the OAuth Endpoints page, make note of the URL of the Discovery Endpoints field.
Step 2: Grant access to miniOrange users
miniOrange allows its users to access OIDC-integrated apps. To create a user follow the instructions below.
-
On the left menu of the miniOrange Dashboard, click Users and then click User List.
-
On the Users page, click the Add User, enter values for the Email, Username, First Name, Last Name, and Password field, and then click Create User.
Step 3: Configure ngrok
ngrok can leverage miniOrange SSO in two ways:
- From the ngrok CLI (using the
--oidcparameter) - From the ngrok dashboard
Option 1: ngrok CLI
Note: For this tutorial, we assume you have an app running locally (i.e., on localhost:3000) with the ngrok client installed.
-
Launch a terminal
-
Enter the following command to launch an ngrok tunnel with miniOrange SSO:
Loading…
Note: Replace the following with values:
- MINIORANGE_OAUTH_URL: The Discovery Endpoint URL you copied from miniOrange, without the
/.well-known/openid-configurationsufix (i.e.https://login.xecurify.com/moas/discovery/v2.0/abcd1234). - MINIORANGE_CLIENT_ID: The client id you copied from miniOrange.
- MINIORANGE_CLIENT_SECRET: The client secret you copied from miniOrange.
Alternatively, add the
--url YOUR_DOMAINargument to get your a custom URL, replacingYOUR_DOMAINwith your URL of preference. - MINIORANGE_OAUTH_URL: The Discovery Endpoint URL you copied from miniOrange, without the
-
Copy the URL available next to Forwarding (for example,
https://miniorange-sso-test.ngrok.app). -
Skip to Step 3
Option 2: ngrok Edge
To configure an edge with miniOrange:
-
Access the ngrok Dashboard and sign in using your ngrok account.
-
On the left menu, click Universal Gateway and then click Edges.
-
If you don't have an edge already set to add miniOrange SSO, create a test edge:
- Click + New Edge.
- Click Create HTTPS Edge.
- Click the pencil icon next to "no description", enter
Edge with miniOrange SSO OIDCas the edge name and click Save.
-
On the edge settings menu, click OIDC.
-
Click Begin setup and enter the following values into the fields:
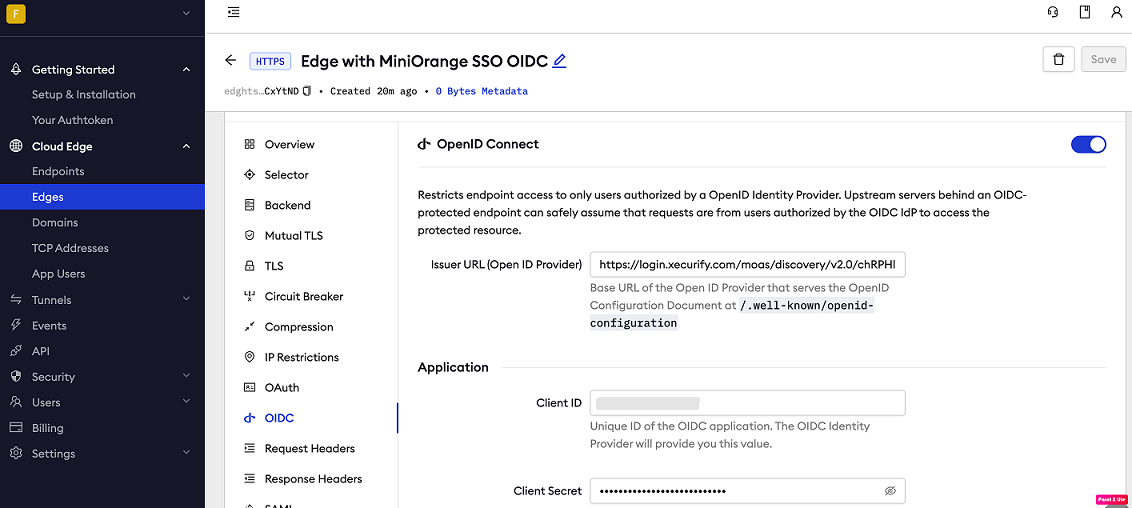
- Issuer URL: The Discovery Endpoint URL you copied from miniOrange, without the
/.well-known/openid-configurationsufix (i.e.https://login.xecurify.com/moas/discovery/v2.0/abcd1234efG). - Client ID: The client id you copied from miniOrange.
- Client Secret: The client secret you copied from miniOrange.
- Issuer URL: The Discovery Endpoint URL you copied from miniOrange, without the
-
Click Save at the top, and then click the left arrow to go back to the Edges page.
Step 4: Start a Tunnel
- Launch a tunnel connected to your miniOrange edge:
For this step, we assume you have an app running locally (i.e. on localhost:3000) with the ngrok client installed.
-
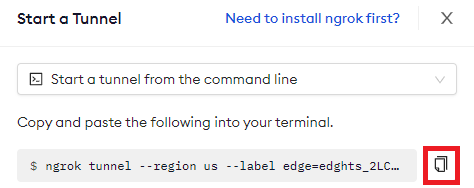
Click Start a tunnel.
-
Click the copy icon next to the tunnel command.
-
Launch a tunnel:
- Launch a terminal.
- Paste the command but replace
http://localhost:80with your localhost app address (i.e.,http://localhost:3000). - Click Enter and an ngrok tunnel associated with your edge configuration will launch.
-
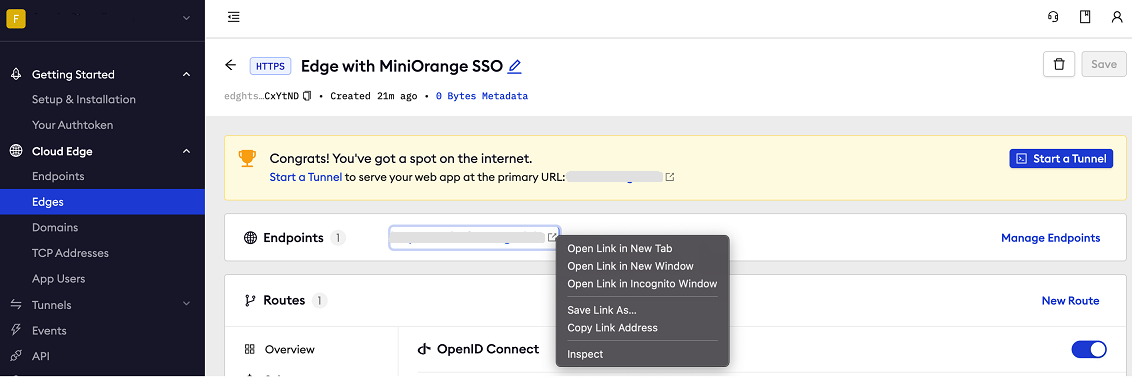
To confirm that the tunnel is connected to your edge:
- Return to the ngrok dashboard
- Close the Start a tunnel and the Tunnel group tabs
- Refresh the test edge page. Under traffic, You will see the message You have 1 tunnel online. Start additional tunnels to begin load balancing.

-
In the test edge, copy the endpoint URL. (You use this URL to test the miniOrange Authentication)
Test the integration
-
In your browser, launch an incognito window.
-
Access your ngrok tunnel using the copied endpoint URL (i.e.,
https://miniorange-sso-test.ngrok.app). -
You should be prompted to log in with your miniOrange credentials.
-
After logging in, you should be able to see your web app.