Ingress to a microservices-based application connected via Linkerd's service mesh
The ngrok Kubernetes Operator is the official controller for adding secure public and middleware execution to your Kubernetes applications with ngrok's cloud service. With ngrok, you can manage and secure traffic to your applications at every stage of the development lifecycle while also benefiting from simpler configurations, security, and edge acceleration.
Linkerd is an open source service mesh, which is a set of network proxies that handle communications between microservices to add in observability, security, and reliability at the platform level, rather than the application level, of your cloud native infrastructure. For example, Linkerd enables mutual TLS (mTLS) between microservices, which ensures confidentiality (encryption) and authenticity (identity validation) on both sides of the connection. After you deploy Linkerd's control plane, you can then install extensions for additional functionality, like a dashboard for debugging errors, exploring workloads, and more.
When integrated, the ngrok Kubernetes Operator and Linkerd abstract complexity away from your entire networking stack (both internal and external traffic), while giving you access to additional monitoring features and more resiliency.
Using this guide, you will launch a local cluster (or use an existing local/remote cluster) to mesh a microservices-based application with Linkerd, and leverage ngrok to route public traffic through an encrypted tunnel to your cluster.
What you'll need
- An existing remote or local Kubernetes cluster OR the minikube CLI installed locally to create a new testing cluster.
- The Linkerd 2.x CLI installed locally with either
the helper script, Homebrew, or by downloading the binary in your
$PATH. - An ngrok account.
- kubectl and Helm 3.0.0+ installed on your local workstation.
- The ngrok Kubernetes Operator installed on your cluster.
- A reserved domain, which you can get in the ngrok
dashboard or with the ngrok
API.
- You can choose from an ngrok subdomain or bring your own custom branded
domain, like
https://api.example.com. - We'll refer to this domain as
<NGROK_DOMAIN>.
- You can choose from an ngrok subdomain or bring your own custom branded
domain, like
Set up a local development cluster
-
Create a local Kubernetes cluster with minikube. You will assign it a profile named
ngrok-linkerdwith-p, and for the best compatibility with Linkerd, you will use thecontainerdcontainer runtime.Loading…
tipIf your OS does not support containerd, you can run minikube without specifying the container runtime.
Loading…
If minikube defaults to using the
dockerruntime, you will likely see an error related to root privileges when installing Linkerd to your cluster. The error includes a workaround to let you install Linkerd despite using thedockerruntime. -
Use
kubectlto verify your local cluster is running properly.Loading…
Deploy Linkerd's service mesh to your cluster
-
Verify your Linkerd CLI is working correctly with
linkerd version, which should display the same output as below. TheServer version: unavailableis expected at this point.Loading…
-
Validate that your Kubernetes cluster is ready to deploy Linkerd with
linkerd check --pre. You should see the following output at the end:Loading…
-
Generate and deploy the Kubernetes manifests required to run Linkerd on your cluster, starting with the .
Loading…
Followed by the core resources.
Loading…
-
Check that Linkerd installed correctly with
linkerd check. You should a number of successful checks in your terminal output, with a final verification at the end.Loading…
noteThese steps are based on the Linkerd documentation, which we encourage you to explore for additional details on the value of a service mesh, additional Linkerd features, and more.
Deploy an example microservices-based application
To demonstrate how Linkerd and the ngrok Kubernetes Operator integrate to add additional observability, security, and reliability into your cluster, you'll deploy the Emojivoto demo application, which was developed by Buoyant, the company that originally developed Linkerd.
-
Create an ngrok static subdomain for ingress if you don't have one already. Navigate to the Domains section of the ngrok dashboard and click Create Domain or New Domain. This static subdomain will be your
NGROK_DOMAINfor the remainder of this guide.By creating a subdomain on the ngrok Edge, you provide a public route to accept HTTP, HTTPS, and TLS traffic.
-
Deploy Emojivoto to the
emojivotonamespace.Loading…
-
Add meshing capabilities by injecting Linkerd's data plane proxies into each pod with a rolling deploy. The following command retrieves all the deployments created in the previous step, injects the Linkerd proxy, and then redeploys each pod.
Loading…
-
Verify your data plane with
linkerd -n emojivoto check --proxy, which should end with a healthy status check.Loading…
-
Create a new
emojivoto-ingress.ymlfile and add the following YAML content, which defines the ngrok Kubernetes Operator for routing traffic arriving on yourNGROK_DOMAINto theweb-svcdeployment, which you created when deploying Emojivoto.tipMake sure you edit line
9of the manifest below, which contains theNGROK_DOMAINvariable, with your ngrok subdomain. It should look something likeone-two-three.ngrok.app.Loading…
-
Apply the
emojivoto-ingress.yamlmanifest you just created.Loading…
Give your cluster a few moments to launch the necessary resources and for ngrok's cloud service to pick up the new tunnel created by the ngrok Kubernetes Operator.
tipIf you see an error when applying the manifest, double-check that you've updated the
NGROK_DOMAINvalue and try again. -
Access your Emojivoto application by navigating to the your ngrok domain, e.g.
https://one-two-three.ngrok.app, in your browser.
Add Linkerd's dashboard to verify meshing and mTLS
Given that one of the key benefits of a service mesh is increased observability, and the inherent security enhancements that come from mTLS connections between your microservices, you'll want to double-check that your deployments and pods are properly meshed.
-
Install the Linkerd dashboard.
Loading…
-
To verify mTLS, first restart all pods in the
emojivotonamespace to enable "tapping".Loading…
-
Then use Linkerd's tap feature, with
linkerd viz -n emojivoto tap deploy, to pipe the traffic stream from all pods in theemojivotonamespace to your terminal. Because the Emojivoto app is designed to automatically generate traffic, you'll see a consistent stream of requests.Loading…
You should see
tls=truein all of these requests between these pods. You can also usekubectl get pods -o wideto see the IP address of each pod, which lets you verify the source and destination of each request. For example, the request shown above is theweb-svcservice sending a POST request, with mTLS enabled, to theemoji-svcservice, which maintains and stores the votes database. -
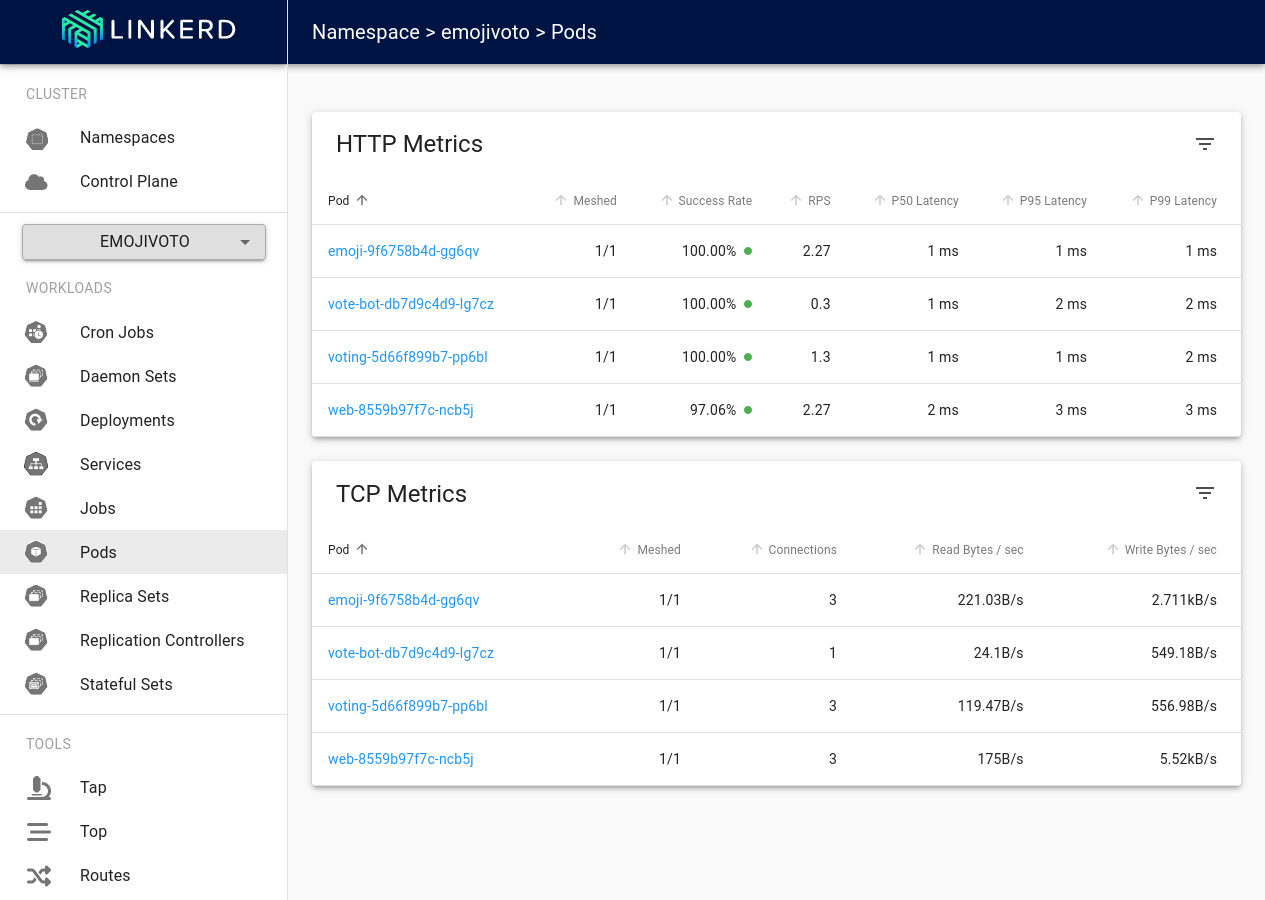
Run
linkerd viz dashboard &, which will open the Linkerd dashboard in your browser. The default dashboard shows various "golden metrics" like real-time success rates, traffic (in requests per second), and latencies per namespace. The first column after the Namespace also displays the number of meshed pods in that namespace, providing additional verification that your services and pods are meshed via Linkerd.Some of the automatically generated traffic is designed to fail, causing the errors you'll see throughout—and showcasing how you can use Linkerd's dashboard to debug issues with pod-to-pod communications.
What's next?
You've now integrated a demo microservices application with Linkerd's service mesh and ngrok's Kubernetes Operator to add multiple new layers of security and reliability without having to worry about configuring middleware, network interfaces, mTLS, or deploying new monitoring services for observing the external behavior of your code.
After deploying this local demo, you have a few options for moving forward.
Clean up
If you're looking to clean up from the work you've done for this local demo, stop and delete your minikube cluster with the minikube CLI:
Loading…
Then remove the Linkerd CLI from your local workstation:
Loading…
Extend your ngrok Kubernetes Operator and Linkerd integration
To bring this integration to a production-grade Kubernetes environment and a real-world application, you will want to explore installing Linkerd with Helm and Buoyant's official Linkerd Production Handbook.
Even in more complex scenarios, you can follow the same procedures listed above to install the ngrok Kubernetes Operator and configure an Ingress service, letting ngrok's cloud service handle routing and middleware execution for simplicity, global load balancing, and automatic encryption.
Learn more about the ngrok Kubernetes Operator, or contribute to its ongoing development, by checking out the GitHub repository and the project-specific documentation.