Calendly Webhooks
To integrate Calendly webhooks with ngrok:
This guide covers how to use ngrok to integrate your localhost app with Calendly by using Webhooks. Calendly webhooks can be used to notify an external application whenever specific events occur in your Calendly account.
By integrating ngrok with Calendly, you can:
- Develop and test Calendly webhooks locally, eliminating the time in deploying your development code to a public environment and setting it up in HTTPS.
- Inspect and troubleshoot requests from Calendly in real-time via the inspection UI and API.
- Modify and Replay Calendly Webhook requests with a single click and without spending time reproducing events manually in your Calendly account.
- Secure your app with Calendly validation provided by ngrok. Invalid requests are blocked by ngrok before reaching your app.
Step 1: Start your app
For this tutorial, we'll use the sample NodeJS app available on GitHub.
To install this sample, run the following commands in a terminal:
Loading…
This will get the project installed locally.
Now you can launch the app by running the following command:
Loading…
The app runs by default on port 3000.
You can validate that the app is up and running by visiting http://localhost:3000. The application logs request headers and body in the terminal and responds with a message in the browser.
Step 2: Launch ngrok
Once your app is running successfully on localhost, let's get it on the internet securely using ngrok!
-
If you're not an ngrok user yet, just sign up for ngrok for free.
-
Go to the ngrok dashboard and copy your Authtoken.
Tip: The ngrok agent uses the auth token to log into your account when you start a tunnel. -
Start ngrok by running the following command:
Loading…
-
ngrok will display a URL where your localhost application is exposed to the internet (copy this URL for use with Calendly).

Step 3: Integrate Calendly
To register a webhook on your Calendly account follow the instructions below:
-
Access Calendly and sign in using your Calendly account.
-
On the My Calendly page, click Integrations on the top menu.
-
On the All integrations page, click the API and webhooks tile and then click Get a token under the Personal access tokens section.
-
On the Before you begin popup, click Continue, enter a name for the token in the Choose a name for this token field, click Create token, click Copy token, and then click Close. Tip: Make note of the token value.
-
On the Your personal access tokens page, scroll down and click Copy Key in the API Key section. Tip: Make note of the key value.
-
Open a terminal window and run the following command to gather information about your account:
Loading…
Note: Replace the value TOKEN in the command with the token value you copied before.
-
The terminal logs the response of the previous command. Copy the value of the current_organization field and the uri field.
-
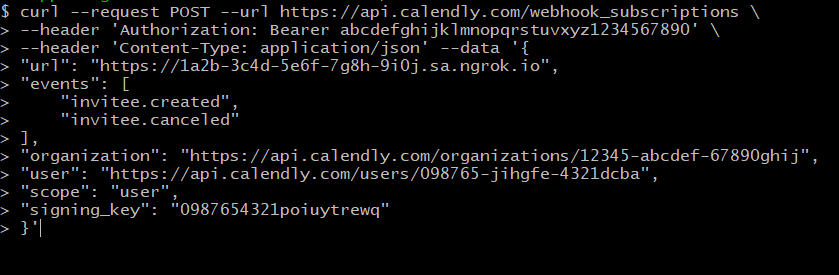
In the terminal window, run the following command to register the webhook:
Loading…
Note: Replace the following with values copied on previous steps:
- URL: the URL provided by the ngrok agent to expose your application to the internet (i.e.
https://1a2b-3c4d-5e6f-7g8h-9i0j.ngrok.app). - TOKEN: the Calendly token.
- ORGANIZATION_URL: The current_organization field you copied before.
- USER_URL: The uri field you copied before.
- KEY: the key you copied before.
- URL: the URL provided by the ngrok agent to expose your application to the internet (i.e.
-
Make sure the response of the previous command contains a resource attribute with the information you provided.
Run Webhooks with Calendly and ngrok
Use your Calendly link to schedule a meeting with you. Note If you don't know your Calendly link, access Calendly, click Account on the top right corner of the page, click Share Your Link, and then copy your link.
-
In your Calendly link, click 30 Minutes Meeting, select a date, and then click Confirm.
-
In the Enter Details page, enter your name and email in the corresponding fields, and then click Schedule Event.
Confirm your localhost app receives the invitee.created event notification and logs both headers and body in the terminal.
Inspecting requests
When you launch the ngrok agent on your local machine, you can see two links:
- The URL to your app (it ends with
ngrok-free.appfor free accounts orngrok.appfor paid accounts when not using custom domains) - A local URL for the Web Interface (a.k.a Request Inspector).
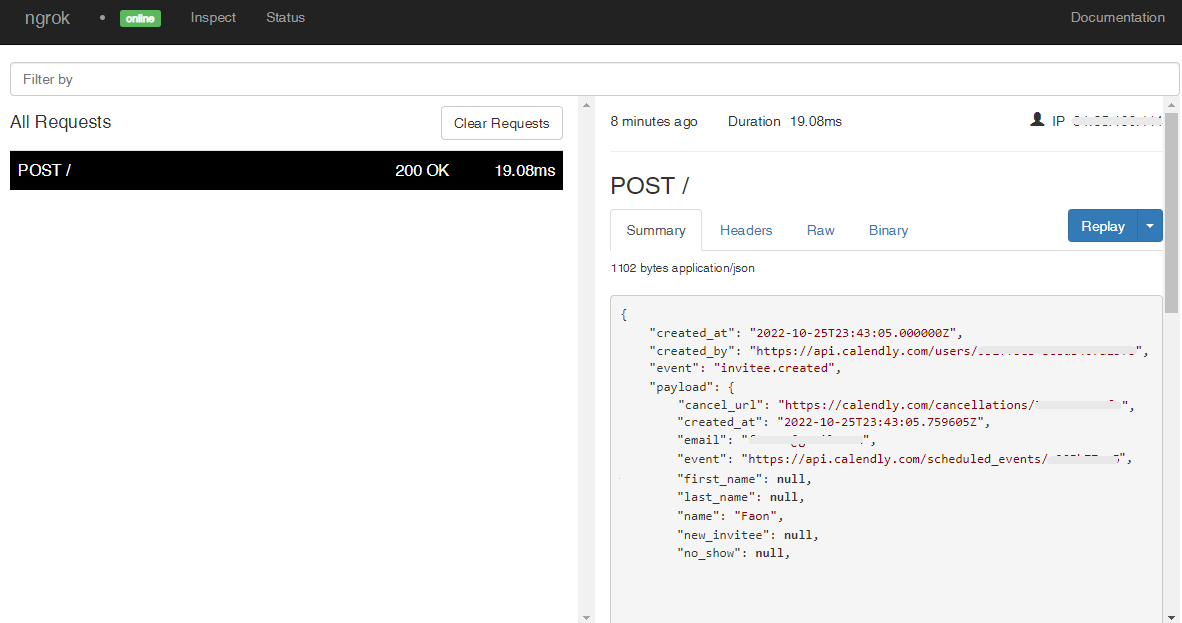
The Request Inspector shows all the requests made through your ngrok tunnel to your localhost app. When you click on a request, you can see details of both the request and the response.
Seeing requests is an excellent way of validating the data sent to and retrieved by your app via the ngrok tunnel. That alone can save you some time dissecting and logging HTTP request and response headers, methods, bodies, and response codes within your app just to confirm you are getting what you expect.
To inspect Calendly's webhooks call, launch the ngrok web interface (i.e. http://127.0.0.1:4040) and then click one of the requests sent by Calendly.
From the results, review the response body, header, and other details:
Replaying requests
The ngrok Request Inspector provides a replay function that you can use to test your code without the need to trigger new events from Calendly. To replay a request:
-
In the ngrok inspection interface (i.e.
http://localhost:4040), select a request from Calendly. -
Click Replay to execute the same request to your application or select Replay with modifications to modify the content of the original request before sending the request.
-
If you choose to Replay with modifications, you can modify any content from the original request. For example, you can modify the created_at field inside the body of the request.
-
Click Replay.
Verify that your local application receives the request and logs the corresponding information to the terminal.
Secure webhook requests
The ngrok signature webhook verification feature allows ngrok to assert that requests from your Calendly webhook are the only traffic allowed to make calls to your localhost app.
Note: This ngrok feature is limited to 500 validations per month on free ngrok accounts. For unlimited, upgrade to Pro or Enterprise.
This is a quick step to add extra protection to your application.
-
Access Calendly and sign in using your Calendly account.
-
On the My Calendly page, click Integrations on the top menu.
-
On the All integrations page, click the API and webhooks tile.
-
On the Your personal access tokens page, scroll down and click Copy Key in the API Key section. Tip: This is the same value you used to register your webhook. See [Integrate Calendly] (#setup-webhook).
-
Restart your ngrok agent by running the command, replacing
{your key}with the value you have copied before:Loading…
-
Access your Calendly link, click 30 Minutes Meeting, select a date, and then click Confirm.
-
In the Enter Details page, enter your name and email in the corresponding fields, and then click Schedule Event.
Confirm your localhost app receives the invitee.created event notification and logs both headers and body in the terminal.