Salesforce Dashboard Single Sign-On (SSO) Using OIDC
This guide walks you through enabling Salesforce as an Identity Provider to allow single sign-on (SSO) into your ngrok dashboard. This should not be confused with securing your ngrok edge to allow your application users to log in using Salesforce.
What you'll need
- Administrative access to create new applications in Salesforce
- Admin access to edit your ngrok account settings
- An ngrok Enterprise account or an SSO/Account Governance license
You may also want to consult the Saleforce documentation on configuring an authentication provider using OpenID Connect.
The OIDC flow is initiated from your Applications login page. (OIDC Service Provider flow is not supported.)
1. Configure Salesforce
Begin by creating a new External Client App in Salesforce:

Configure your new external app according to the following criteria:
- In the Policies tab:
- Go to App Policies
- Set Start Page to Custom
- Set Custom Start URL to
https://dashboard.ngrok.com/login/sso
- Go to App Policies
- In the Settings tab:
- Go to Basic Information and set the External Client App Name
- Go to OAuth Settings > App Settings:
- Set the OAuth Scopes:
- Access the Identity URL Service (id, profile, email, address, phone)
- Access unique identifiers (openid)
- Access custom permissions (custom_permissions)
- Set Configure ID Token:
- Set ID Token Audience to:
https://idp.ngrok.com - Set Include Standard Claims
- Set Custom Attributes
- Set ID Token Audience to:
- Flow Enablement:
- Set Enable Authorization Code and Credentials Flow
- Security:
- Set Require Secret for Web Server Flow
- Set Require Secret for Refresh Token Flow
- Set the OAuth Scopes:
Finally, note your Client ID (Consumer Key) and Secret—these can be found in OAuth Settings > App Settings:

2. Configure ngrok
Now, configure SSO for your ngrok account:
- Log into your ngrok dashboard and navigate to Settings > Account.
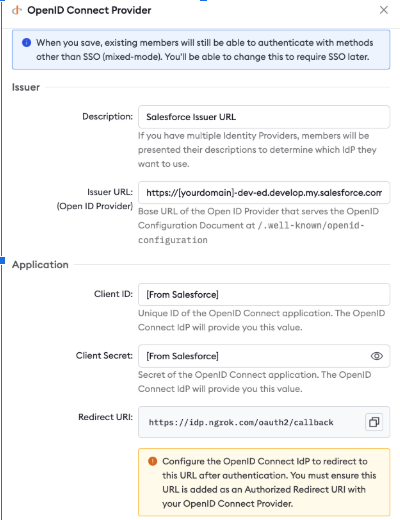
- Click + New Identity Provider and select New OpenID Connect Provider.

- Add a description and set the following details:
- Issuer URL, in the format
[yourdomain]-dev-ed.develop.lightning.force.com - Client ID (from Salesforce)
- Client Secret (from Salesforce)
- Issuer URL, in the format
You should now be configured properly to log into your ngrok account using Salesforce.
By default, users will still be able to log into ngrok with their existing credentials as well as through Salesforce—this is known as "mixed mode." Once you verify that everything is working properly with your integration, you can enforce SSO in the ngrok dashboard and require all new users to log in through Salesforce for their ngrok account.