This guide walks you through a practical example of using the ngrok as an API gateway to securely expose and manage APIs running in Kubernetes clusters that span multiple cloud providers. In this scenario, you’ll see how to unify access to services deployed in different environments, simplify connectivity, and enforce consistent security policies—all without the complexity of managing separate ingress solutions in each cloud.Documentation Index
Fetch the complete documentation index at: https://ngrok.com/docs/llms.txt
Use this file to discover all available pages before exploring further.
Example scenario
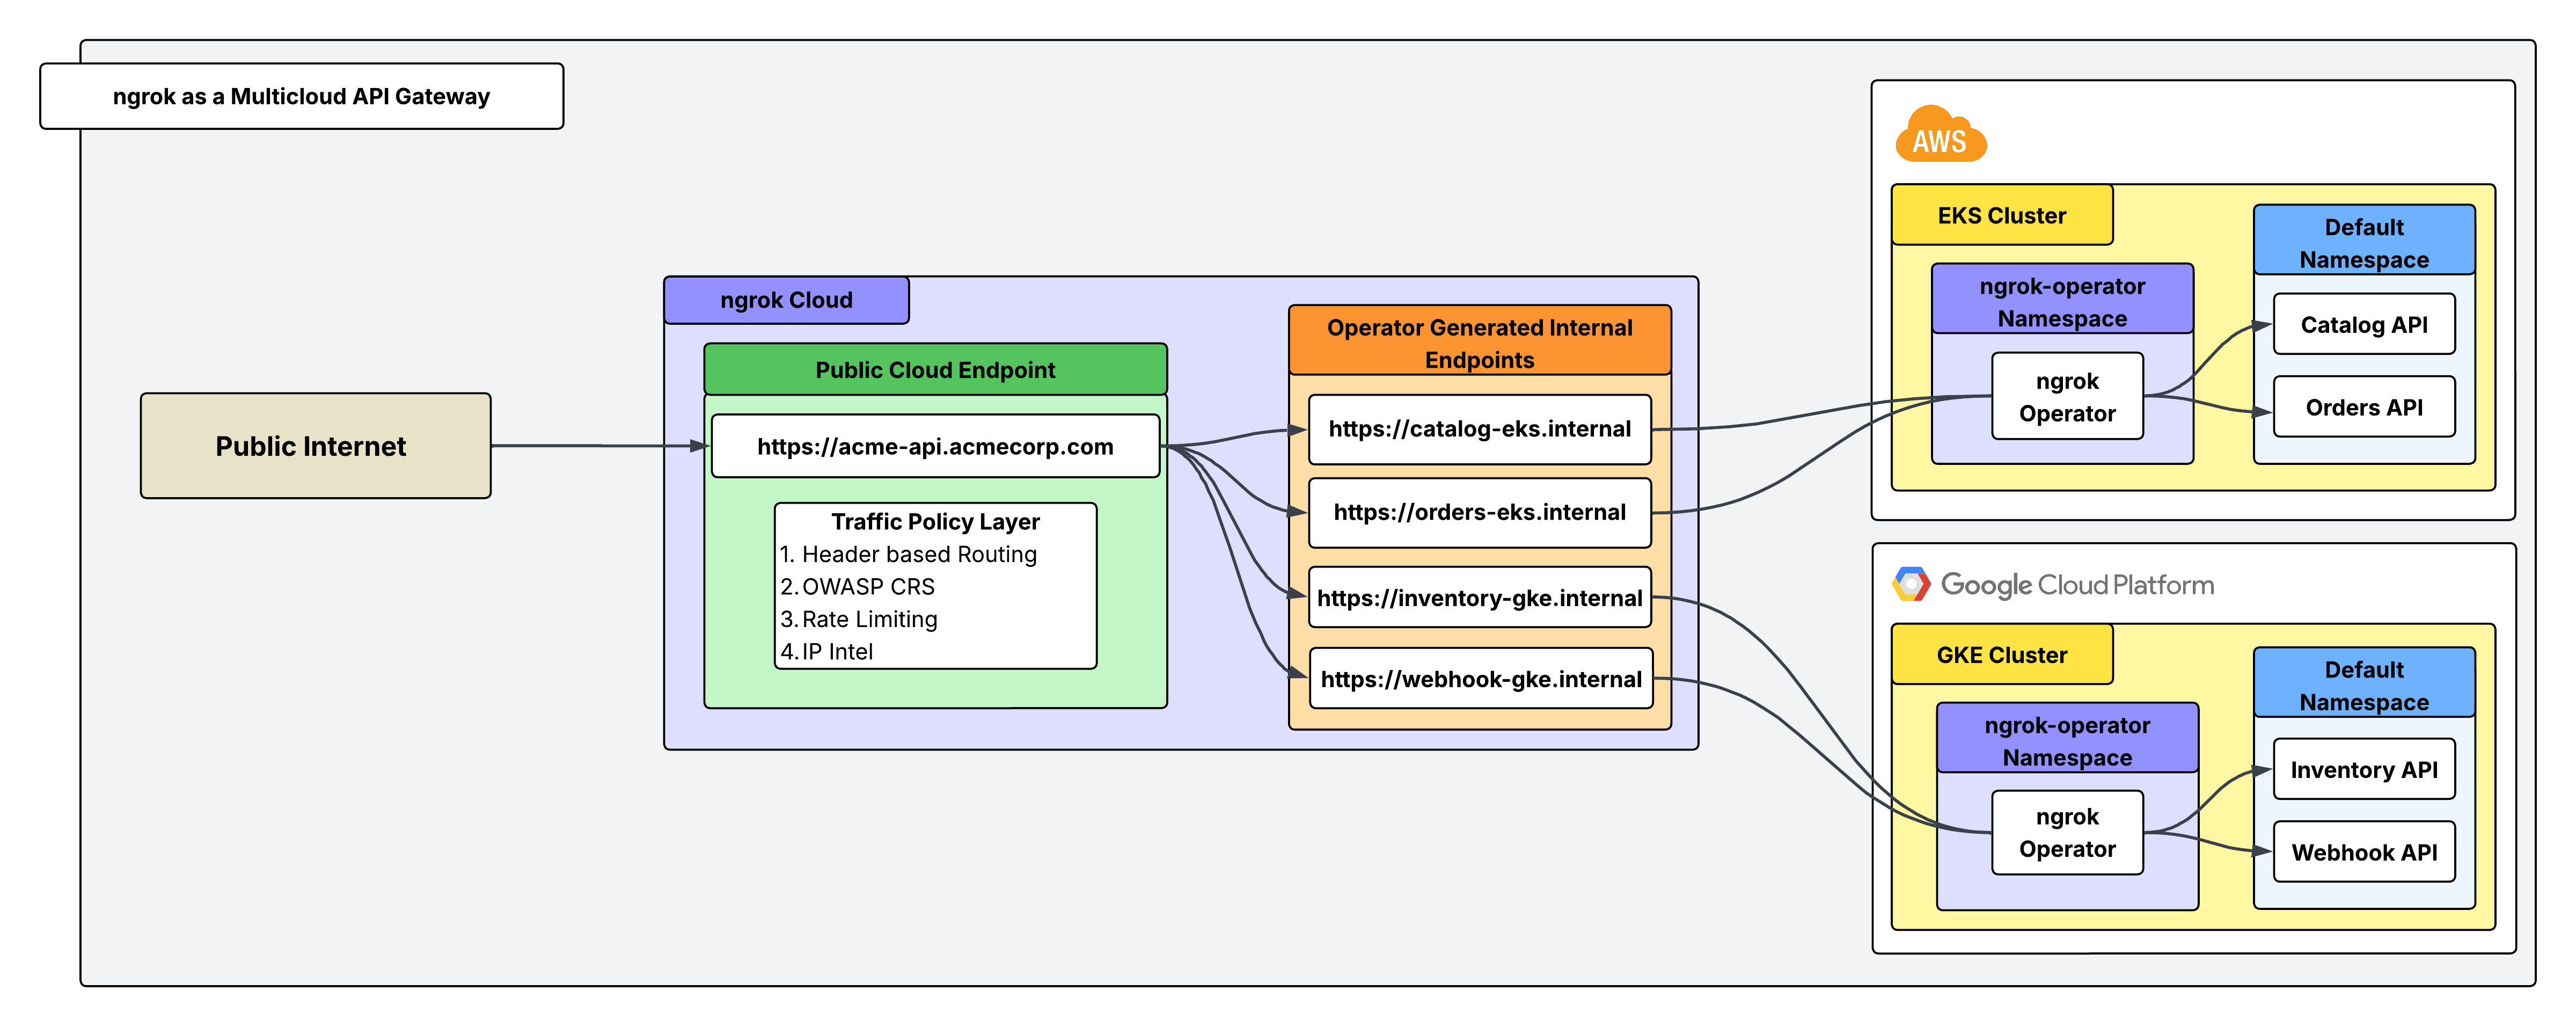
You run Acme Corp, which has long operated its core infrastructure in AWS, where a Kubernetes cluster hosts a suite of APIs critical to your customers. Recently, Acme acquired a subsidiary (Betatech) that built its own platform in GCP, also relying on Kubernetes to power customer-facing services. Suddenly, Acme finds itself managing APIs in two separate clouds, each with its own networking stack, security controls, and exposure requirements. In EKS, Acme runs a Catalog API, which provides product listings to customers, and an Orders API, which partners and users rely on to place and manage orders. In GKE, Betatech maintains an Inventory API, exposing stock levels and reservation capabilities, along with a Webhook Receiver API, which ingests real-time events from third-party systems. You need a way to expose these APIs to the public internet without the complexity of juggling multiple cloud-specific solutions. This is where ngrok’s API gateway comes into play with one secure and consistent entry point for all of your distributed services.Architectural reference
What you’ll need
- An ngrok account. If you don’t have one, sign up.
- Two K8s clusters running on separate VMs (ideally each within a distinct cloud provider).
- Not running kubernetes? Try installing the ngrok agent in your cloud infrastructure directly
- An ngrok API Key. You’ll need an account first.
1. Install the ngrok operator within each K8s cluster
The ngrok Kubernetes Operator lets you declaratively expose cluster Services through ngrok by reconciling simple manifests into managed, secure endpoints. Before you install the operator, save your ngrok authtoken and API key as environment variables. To install the operator, run this command from inside each of your Kubernetes clusters that host your backend APIs:2. Create an internal endpoint for each API
Use theAgentEndpoint CRD to register an internal endpoint per API in each cluster.
Internal endpoints are not internet-reachable; they’re only targetable from other ngrok endpoints via the forward-internal Traffic Policy action—perfect for wiring a single public gateway to multiple cluster services. To make an endpoint internal, set spec.bindings: ["internal"] and end spec.url with .internal.
- EKS
- GKE
agentendpoints-eks.yaml
3. Create a public Cloud Endpoint and attach Traffic Policy
Cloud Endpoints are persistent, always-on endpoints you manage centrally via the dashboard or API. Cloud Endpoints don’t forward their traffic to an agent by default and instead only use their attached Traffic Policy to handle connections. In this case, this single Cloud Endpoint will act as the gateway to receive incoming requests and route them to the correct internal endpoint based on a header (X-Acme-Api) sent with the request.
Create a public Cloud Endpoint in the ngrok dashboard by navigating to endpoints and clicking new as shown in the screenshot below:
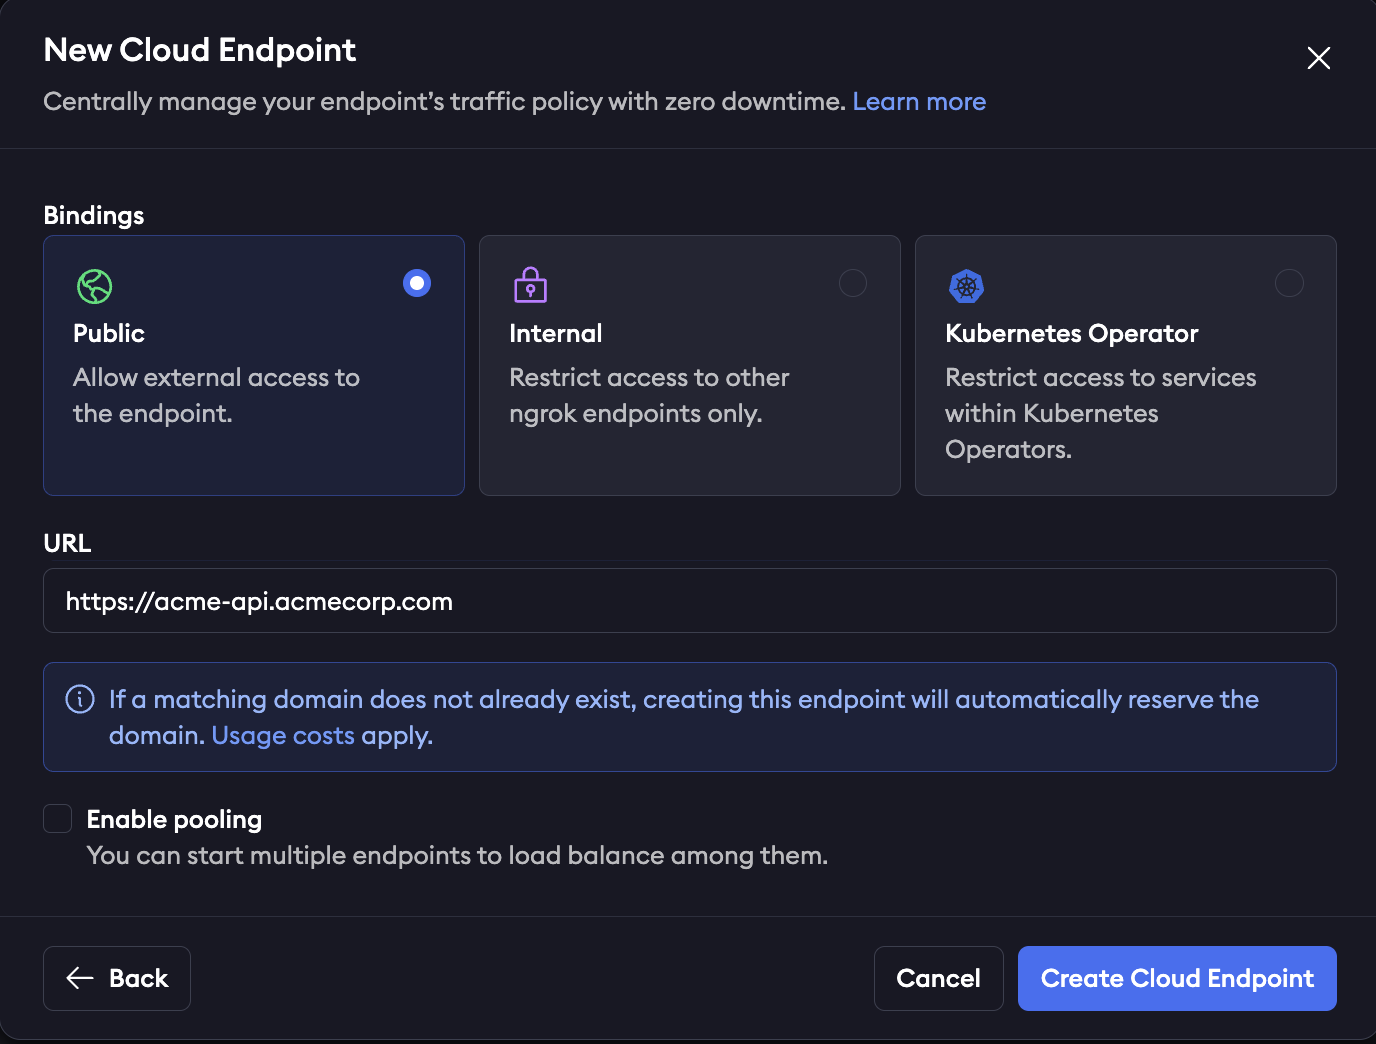
X-Acme-Api and route it to that corresponding internal endpoint. For example, a request sent with the header X-Acme-Api: catalog-eks will route to https://catalog-eks.internal, which is configured to point to the Catalog API in your EKS cluster.
4. Attach Traffic Policy to authenticate your Cloud Endpoint
Traffic Policy is ngrok’s configuration language for endpoints. In this example, the Traffic Policy for your Cloud Endpoint handles routing rules (seen in step 3), rate limiting, authentication, and firewall rules. A full list of available Traffic Policy actions can be seen here. Use these actions by themselves or layered on top of each other (executed sequentially from top to bottom). Here’s how your Traffic Policy YAML might look for your Cloud Endpoint:5. Load balance with endpoint pooling
Load balancing at ngrok is done with endpoint pooling. When multiple ngrok endpoints are created with the same URL and with the pooling_enabled flag, ngrok automatically balances traffic across them. For AgentEndpoint resources, pooling is always on: if more than one agent creates the same internal URL, requests are balanced across them. Nothing changes in your Cloud Endpoint config—and ngrok now spreads requests across the pooled internal endpoints.Recap
You’ve successfully unified your APIs across EKS and GKE. A single public ngrok Cloud Endpoint points to 2 pools of internal endpoints, and Traffic Policy is handling routing, authorization, and security. To recap:- Installed the ngrok Kubernetes Operator in both clusters (EKS and GKE)
- Created internal AgentEndpoints for Catalog, Orders, Inventory, and Webhooks using AgentEndpoint CRDs.
- Deployed one public Cloud Endpoint and routed by request headers to the correct internal backends with per-API security (rate limits, IP allowlists, OWASP).
- Achieved load balancing & resilience via endpoint pooling by running multiple agent replicas.